How to Grow Wine Cap Mushrooms Outdoors in Wood Chip Beds

Every other cultivation guide on MyceliumNest involves some combination of sterilization, sealed containers, and controlled indoor environments. Wine cap mushrooms (Stropharia rugosoannulata, also called King Stropharia or Garden Giant) require none of that. You lay wood chips in a garden bed, layer in spawn, water it, and wait. The mycelium colonizes outdoors, in open soil, competing successfully against wild contamination — something that would destroy an indoor grain jar within days. This is the lowest-barrier entry point into growing your own mushrooms of any method covered on this site, and it doubles as a genuine soil-building garden practice. In this guide you will discover how to grow wine cap mushrooms outdoors in wood chip beds
- Choosing Your Substrate — The Carbon-to-Nitrogen Science
- Wood Types to Avoid Entirely
- The Wood Chip & Spawn Calculator
- Building the Bed — Step by Step
- Fresh vs Aged Wood Chips — Why Timing Matters
- Seasonal Timeline — Planting to First Harvest
- Protecting Your Bed From Slugs and Snails
- Maintaining Your Bed for 3 Years of Production
- Companion Planting — Stacking Functions
- Harvesting at Peak Flavor
- Frequently Asked Questions
Choosing Your Substrate — The Carbon-to-Nitrogen Science
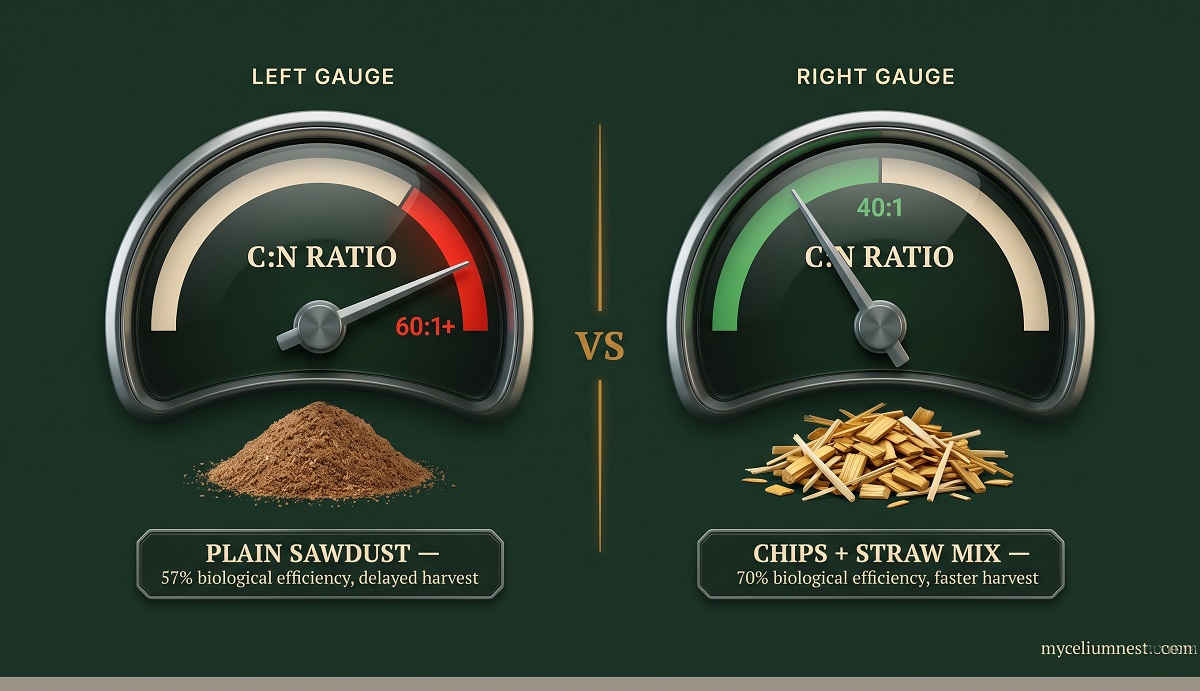
Most beginner guides say “just use wood chips” and stop there. This is where wine cap cultivation quietly fails for a lot of first-time growers — not from contamination, but from choosing a substrate with the wrong carbon-to-nitrogen (C:N) ratio, which delays fruiting or suppresses it almost entirely.
Stropharia rugosoannulata performs best on substrate with a C:N ratio near 40:1. Plain waste sawdust alone — the material many people default to because it’s free or cheap — typically carries a C:N ratio above 60:1. That gap matters in practice: research-grade cultivation data shows a high-carbon-only substrate can delay first harvest by more than a week and reduce biological efficiency from roughly 70% down to 57% compared to a properly balanced mix.
The fix is simple: a 50/50 mix of hardwood wood chips and chopped cereal straw by volume consistently outperforms plain wood chips or plain sawdust alone. The straw brings the nitrogen content up closer to the ideal ratio, without needing any purchased nitrogen supplement. Optionally, mixing in well-rotted stable manure adds further nitrogen for growers wanting to push toward faster colonization.
This isn’t just theory. A field trial published in Agroforestry Systems tested wood-chips-alone against a straw-and-wood-chip mix in real outdoor beds over two consecutive growing seasons in Missouri — the straw/chip combination consistently produced more mushrooms than wood chips alone in both years, independently confirming the substrate mix recommended here.
Wood Types to Avoid Entirely
Not every hardwood works, and a surprising number of home growers unknowingly sabotage their bed at the sourcing stage. Wine cap does well on oak, maple, poplar, and alder chips. Avoid these three specifically — their natural chemical compounds actively inhibit mycelial growth:
The Wood Chip & Spawn Calculator
Commercial spawn suppliers genuinely disagree on optimal spawn density — and both approaches are legitimate, representing a real trade-off rather than one source being wrong. Standard density (used by suppliers like Field & Forest Products) uses more spawn per square foot for faster colonization and stronger competitive advantage against wild contamination. Economy density uses roughly a quarter as much spawn, colonizes more slowly, but costs significantly less — a reasonable trade-off for a low-stakes garden bed with no rush.
| Bed Size | Wood Chips Needed (4″ depth) | Spawn — Standard Density | Spawn — Economy Density |
|---|---|---|---|
| 25 sq ft (5×5 border) | ~0.3 cubic yards | 5 lbs | ~2 lbs |
| 50 sq ft (garden pathway) | ~0.6 cubic yards | 10 lbs | ~4 lbs |
| 100 sq ft (border around fruit tree) | ~1.2 cubic yards | 20 lbs | ~7.5 lbs |
| 200 sq ft (full bed/large border) | ~2.5 cubic yards | 40 lbs | ~15 lbs |
Wood chip volume calculated at 4″ depth, the lower end of the recommended 4–6″ range. Most arborists deliver 5–10 cubic yards of chips free or at low cost per load — often more than enough for a bed this size with material left over.
Building the Bed — Step by Step
- Choose a partially shaded location. The north side of a building, a forest edge, or under an established tree canopy all work well. Full sun beds dry out fast and need significantly more watering to stay productive.
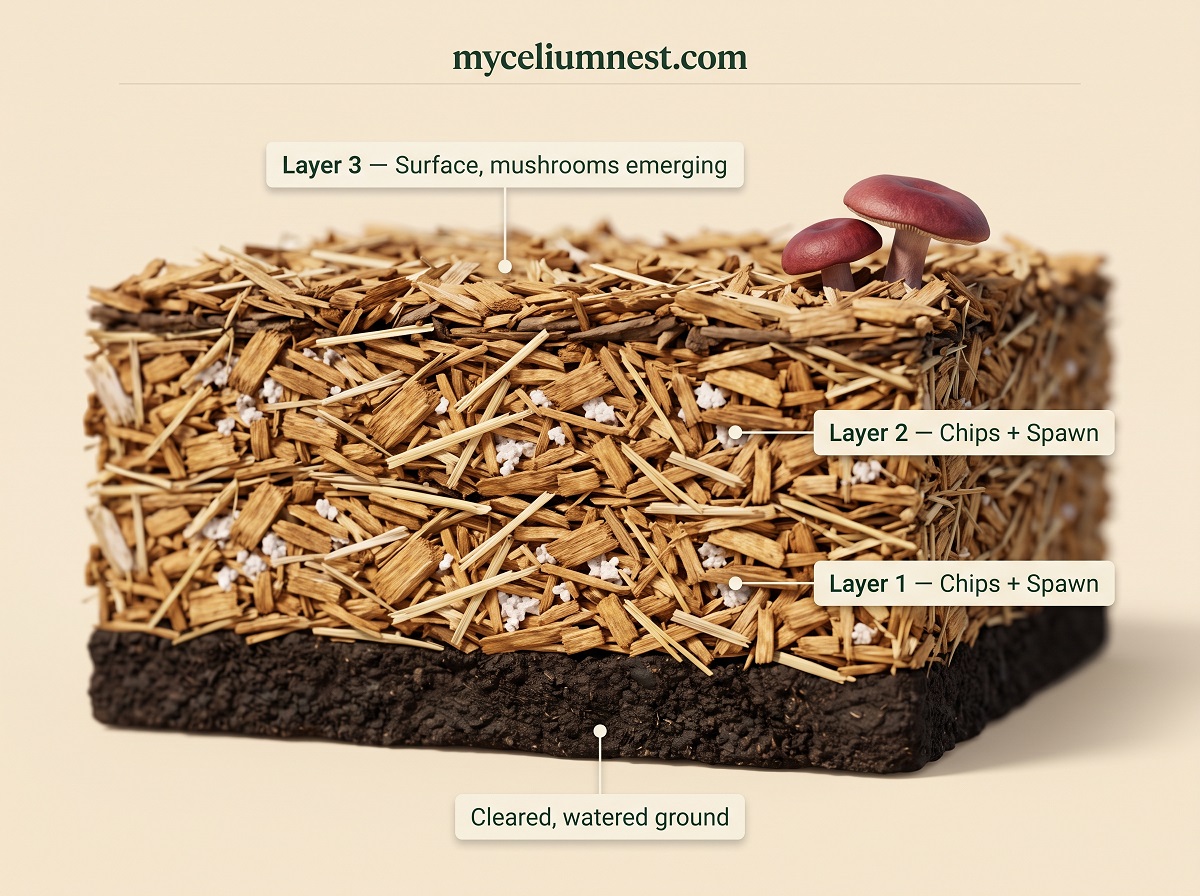
- Clear the area. Remove sod, weeds, and debris. Optionally lay a layer of soaked cardboard first — this smothers remaining weeds and breaks down as an additional carbon source.
- Water the cleared ground thoroughly before adding any substrate.
- Spread the first substrate layer — 2 inches of your hardwood chip and straw mix.
- Crumble and scatter spawn evenly across this layer — don’t just dump it in one spot.
- Repeat the layering — another 2-inch substrate layer, another spawn layer — building up to your target 4–6 inch total depth in 2–3 layers, like lasagna.
- Water the finished bed deeply until moisture reaches the bottom layer, without pooling on the surface.
- Keep the bed consistently moist for the first 3–4 weeks while mycelium establishes — this is the single most failure-prone period, since dried-out spawn simply stops colonizing.
Growing somewhere hot and dry? During heatwaves or extended dry spells, lay soaked burlap sacks or a 2-inch layer of clean wheat straw over the top wood chip layer. This traps humidity against the substrate without suffocating airflow, and can be the difference between a bed that dries out and stalls versus one that keeps colonizing through a hot summer.
Fresh vs Aged Wood Chips — Why Timing Matters
Fresh, recently-cut green wood chips (chipped within the last two weeks) colonize noticeably faster than dried, aged chips — their internal moisture content is already close to what the mycelium prefers, rather than needing to be rehydrated from a dry state. If your delivered chips have already dried out, soak them thoroughly with a hose for 24 hours before building the bed. This single step can speed up establishment by 2–3 weeks compared to laying dry chips and hoping rainfall catches up.
Seasonal Timeline — Planting to First Harvest
| Stage | Timing | What You’ll See |
|---|---|---|
| Planting | Spring (April ideal) or Autumn | Freshly layered bed, spawn not yet visible |
| Colonization | 2–6 weeks after planting | White, ropey mycelial cords webbing through the chip layers |
| First Flush | ~8 weeks after spring planting, often triggered by rain | Burgundy-capped mushrooms emerging from the chip surface |
| Ongoing Flushes | Throughout the growing season, especially after rain | Repeated harvests, often heaviest in early autumn as temperatures cool |
| Bed Lifespan | Up to 3 productive years with maintenance | Gradual decline as wood chips fully decompose into rich soil |
Protecting Your Bed From Slugs and Snails
Damp, shaded wood chip beds are exactly the environment slugs and snails prefer — and young wine cap pins have no defence against them overnight. This is the most common practical complaint from first-time outdoor growers, and it’s straightforward to manage with a few low-cost organic methods:
None of these methods need to be perfect — a wine cap bed in full production typically outpaces modest pest losses, especially once the mycelium is well established in its second season.
Check copper slug tape on Amazon → · Check diatomaceous earth on Amazon →Maintaining Your Bed for 3 Years of Production
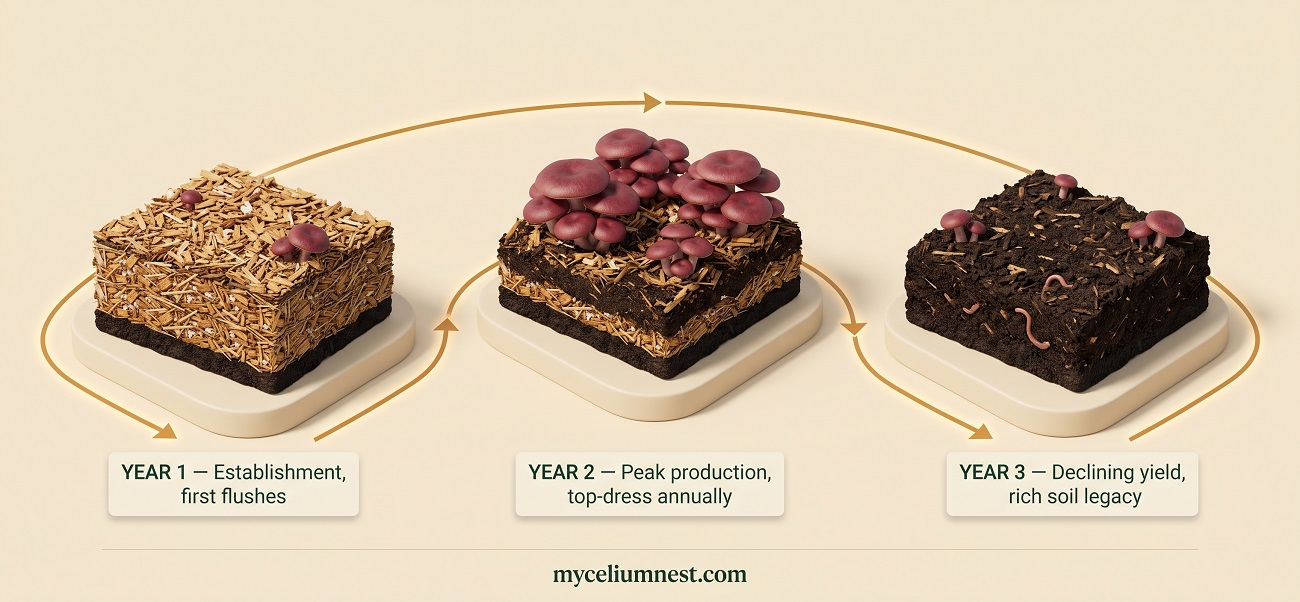
Top-dress the bed annually with 2–4 inches of fresh wood chips mixed with straw, worked lightly into the existing top layer. This replenishes the substrate the mycelium has already consumed and extends productive life significantly beyond what an unmaintained bed would achieve.
Cornell Cooperative Extension’s cultivation guide confirms this fall top-dressing practice directly, and adds a useful bonus once your bed is established: after a patch has colonized an area for one full season, you can dig up handful-sized chunks of the colonized wood chips and spread them into new beds elsewhere in the garden — effectively free spawn from your own success, with no need to buy more.
How to know your bed is spent: A bed has reached the end of its productive life when it produces no pins for two consecutive fruiting seasons despite adequate moisture, shade, and normal seasonal temperatures — or when the substrate shows visible advanced decomposition and heavy earthworm activity, meaning the wood has largely broken down into soil. At that point, the bed has done its job twice over: you’ve harvested mushrooms for years, and you’re left with rich, worked garden soil.
Companion Planting — Stacking Functions
Wine cap beds are a favourite in permaculture design specifically because they “stack functions” — a single planting action produces multiple benefits simultaneously. Growers commonly establish beds along garden pathways, around the base of fruit trees, bordering asparagus rows, or under blueberry bushes. The mycelium suppresses weeds, breaks decomposing wood chips down into usable soil far faster than chips would decompose alone, and produces a genuine harvest — all from material (wood chips) that many gardeners already have or can source free from local arborists.
For the broader principles behind matching a cultivation method to your specific setup — indoor versus outdoor, controlled versus low-intervention — see our complete beginner’s framework, and for a contrast with the controlled-environment approach, our indoor oyster mushroom guide shows the other end of the cultivation spectrum.
source free from local arborists.For the broader principles behind matching a cultivation method to your specific setup — indoor versus outdoor, controlled versus low-intervention — see our complete beginner’s framework, and for a contrast with the controlled-environment approach, our indoor oyster mushroom guide shows the other end of the cultivation spectrum.
Harvesting at Peak Flavor
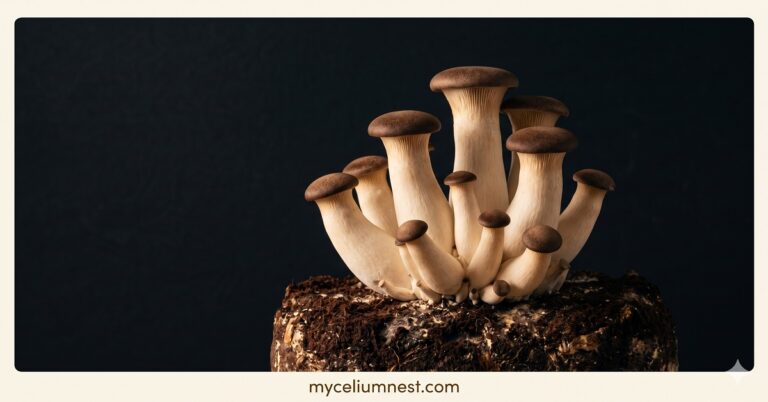
Wine caps are best harvested while the cap is still somewhat rounded and the veil beneath it hasn’t fully broken away — at this stage the flesh has an extra-rich, cashew-like flavour that fades as the mushroom matures and the cap flattens. As the mushroom ages, the ring visible on the stalk (a remnant of the broken veil) becomes more pronounced, and the bright burgundy cap colour fades toward a purplish tan — both useful visual cues for judging ripeness at a glance.
Any outdoor bed can occasionally host a wild mushroom that colonized the same wood chips independently of your spawn. Wine cap is genuinely distinctive once you know what to check — confirm all three before eating anything from the bed:
If a specimen is missing any one of these three features, don’t eat it — cross-check against our poisonous mushrooms guide or a regional field guide instead.
Frequently Asked Questions
Do wine cap mushrooms need a fruiting chamber or humidity control like other cultivated species?
No. This is the core appeal of outdoor wine cap cultivation — the mushroom fruits directly in open garden conditions, relying on ambient rainfall and natural humidity rather than any controlled environment. Compare this to our indoor fruiting conditions guide, which covers the humidity and temperature management required for species grown in bags, tubs, or grow tents — none of which applies here.
Can I use straw instead of wood chips entirely?
Yes, wine cap will colonize a straw-only bed, though most growers find a wood-chip-and-straw combination produces a longer-lasting, more productive bed than straw alone, since straw decomposes faster than wood. A straw-only bed typically needs 6–8 inches of depth compared to 4–6 inches for a chip-based bed, and will need replenishing sooner.
My bed isn’t pinning even though I can see white mycelium everywhere. What’s wrong?
The most common cause is a substrate carbon-to-nitrogen ratio that’s too high — typically from using plain wood chips or sawdust without straw or another nitrogen source mixed in. Top-dress the bed with chopped straw worked into the surface layer and maintain consistent moisture; this often resolves stalled pinning within a few weeks. For a complete stage-by-stage diagnostic across all cultivation problems, see our troubleshooting guide.
Will wine cap mushrooms spread uncontrollably through my whole garden?
Wine cap mycelium is confined to whatever lignocellulose material (wood chips, straw) it’s growing through — it will not spread into living plant roots or bare soil without a carbon source to colonize. It can spread into adjacent areas if you extend wood chip mulch beyond the original bed, which many growers do intentionally to expand production, but it won’t invade lawn grass or garden beds without wood-based material to grow through.
This article contains Amazon affiliate links. See our full disclosure.
Similar Posts
Liquid Culture for Mushroom Growing: The Complete Guide
Written by the MyceliumNest Team Liquid culture for mushroom growing: Liquid culture changed our operation more than any other technique upgrade. The colonisation speed improvement, the ability to expand genetics indefinitely from a single clean culture, and the economics of LC vs. buying syringes repeatedly — this guide covers all of it from direct experience….
How to Grow King Oyster Mushrooms Indoors: The Complete Guide
Written by the MyceliumNest Team King oyster is the most elegant and most demanding oyster species we grow. The technique for producing thick, restaurant-quality stems — and why most indoor growers get flat caps instead — comes from direct cultivation experience across 3+ years and 40+ king oyster blocks. Beyond its culinary reputation, Pleurotus eryngii…
Mushroom Contamination Guide: Identify, Treat & Prevent Every Type
Written by the MyceliumNest Team 4+ years growing 12+ mushroom species across multiple substrate types. We have encountered — and diagnosed — every contamination type covered in this guide through direct cultivation experience. Quick Reference Green = Trichoderma (discard outdoors). Pink/Red = bacteria (discard outdoors). Black = Aspergillus or Cladosporium (discard outdoors). White/grey wispy =…
Why Isn’t My Mushroom Growing? The Complete Troubleshooting Guide
Written by the MyceliumNest Team Every symptom in this guide is one we’ve either personally troubleshot in our own grows or diagnosed for readers over four years of cultivation. This is the guide we wish existed when our first PF Tek jar turned into a cloud of green mold. Before You Panic — Identify Your…
How to Make Grain Spawn: The Complete Step-by-Step Guide
Written by the MyceliumNest Team We’ve made grain spawn across six grain types, three pressure cooker models, and multiple species over 4+ years. The failure modes and solutions in this guide come from direct experience — including the batches that taught us what not to do. What You Need to Know First Grain spawn failures…
Best Mushroom Growing Bags (2025): Tested by Filter Patch Rating & Real Contamination Data
Written by the MyceliumNest Team · Equipment Tested We have processed 500+ bags across six brands over four years. Rankings are based on filter patch integrity, bag wall durability under repeated pressure cycling, and correlation with contamination rates in our operation. Quick Verdict Unicorn Bags (specifically the 10B and T3 series) remain the industry standard…