How to Make Grain Spawn: The Complete Step-by-Step Guide
Grain spawn failures are almost always caused by two problems: (1) grain that is too wet when loaded into jars — creating anaerobic conditions where bacteria dominate, or (2) insufficient sterilisation time and pressure. Grain choice matters far less than most guides suggest. Getting these two variables right prevents 80% of grain spawn contamination.
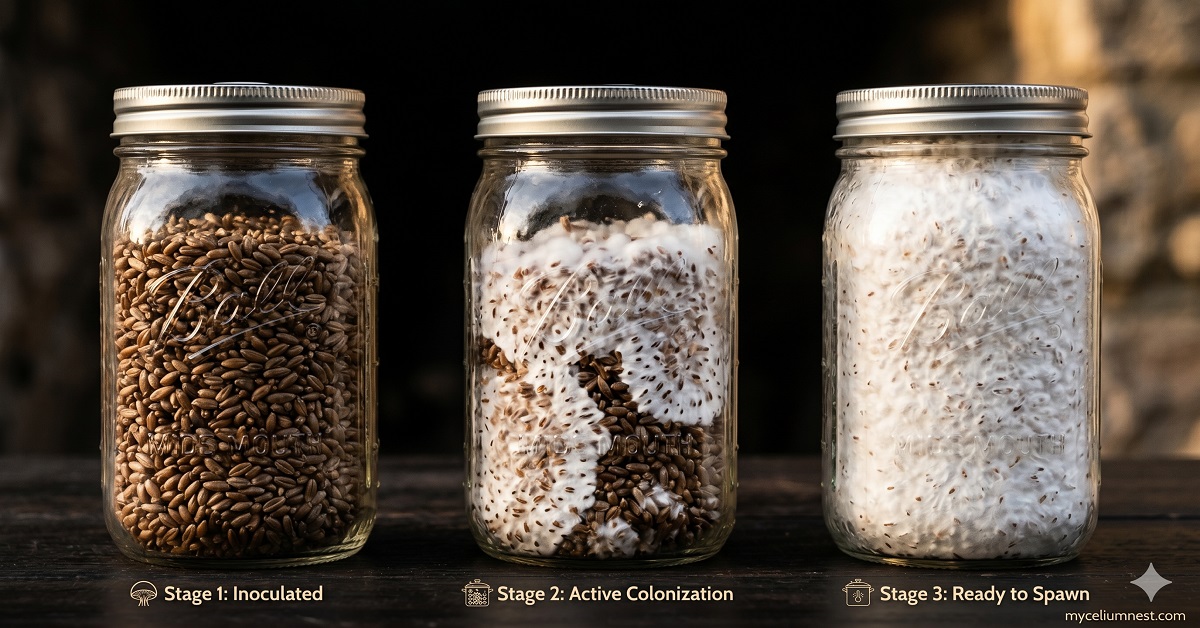
Grain spawn is the engine of mushroom cultivation. A colonised jar of rye, wheat, or corn creates a ready-to-deploy inoculation medium that transfers mycelium into bulk substrate with dramatically higher colonisation speed and efficiency than a spore syringe alone. Once you can reliably produce grain spawn, your growing operation scales in every direction — more species, bigger blocks, faster turnaround, lower cost per harvest. This guide focuses on what you need to know on how to make grain spawn perfectly and healthy.
The challenge: grain spawn is also more contamination-prone than BRF cakes. Grain is an extraordinarily rich substrate that bacteria love as much as mushrooms do. The margin for error on moisture content and sterilisation is narrower. This guide gives you the complete protocol with the specific numbers and tests that eliminate guessing.
Choosing Your Grain: What Actually Matters
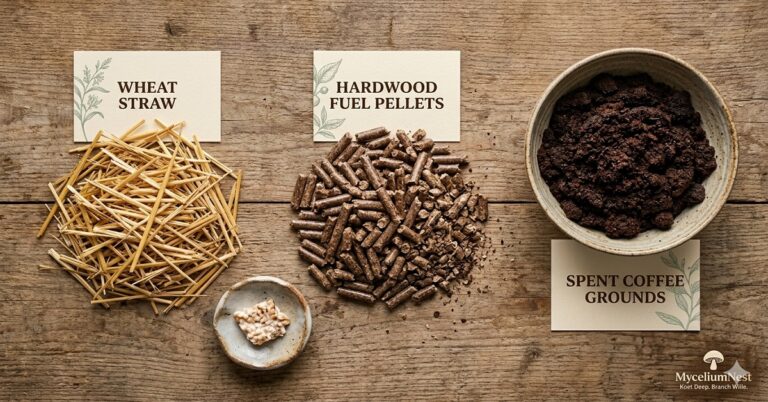
The online debate about grain choice — rye vs. wheat vs. oats vs. popcorn — is largely a distraction. In our direct testing, colonisation speed and contamination rates across different grain types vary by less than 15% when preparation is identical. What matters enormously is grain quality, freshness, and preparation. A perfectly prepared jar of popcorn outperforms a poorly prepared jar of rye every time.
Grain Comparison: The Honest Numbers
| Grain | Colonisation Speed | Contamination Risk | Availability | Notes |
|---|---|---|---|---|
| Rye berries | Fast | Moderate-High | Health food stores, online | Industry standard. High nutrition but unforgiving on moisture. Absorbs water unevenly if rushed. |
| Wheat berries | Fast | Low-Moderate | Widely available, affordable | Best beginner grain. More forgiving moisture range than rye. Hard wheat holds structure well through sterilisation. |
| Whole oats | Moderate | Low | Grocery stores, horse feed stores | Very forgiving. Lower nutrition means slower colonisation but lower bacterial competition. |
| Popcorn (whole kernel) | Moderate-Slow | Low | Grocery stores, dollar stores | Larger kernel = slower but very reliable. Excellent for beginners. Hard outer hull resists over-hydration. |
| Wild bird seed | Fast | High | Garden centres, dollar stores | Mixed grain composition creates uneven hydration. High contamination risk. Not recommended for beginners. |
| Sorghum (milo) | Moderate | Low | Farm supply stores, online | Small, dense kernel. Excellent surface area for mycelium. Underrated and underused. |
Equipment List
- Pressure cooker at 15 PSI — see our pressure cooker guide
- Wide-mouth quart mason jars with modified lids (polyfill + foil) OR filter patch bags
- Large pot for boiling/simmering grain
- Colander for draining
- Clean kitchen towels or paper towels
- Spray bottle with 70% isopropyl alcohol
- Inoculation source (grain-to-grain or LC syringe)
- Still air box or flow hood
- Kitchen scale (for consistent loading volumes)
- Digital thermometer (grain temp before inoculation)
- Canning funnel (for mess-free jar loading)
- Alcohol lamp or butane lighter for flaming needles
The Hydration Process: The Most Critical Step
Grain hydration is where the majority of grain spawn failures originate. The goal is grain that is fully hydrated throughout its interior but completely surface-dry on the outside. This sounds simple. In practice it requires discipline and testing.
Why Moisture Content Is Everything
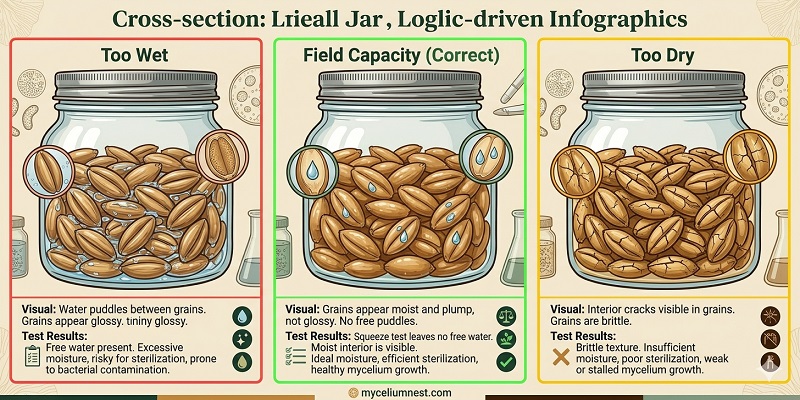
Grain kernels at the correct moisture contain free water distributed evenly throughout the interior tissue. The outer surface, however, must be dry — meaning no free water on the kernel exterior. Why does this distinction matter so critically?
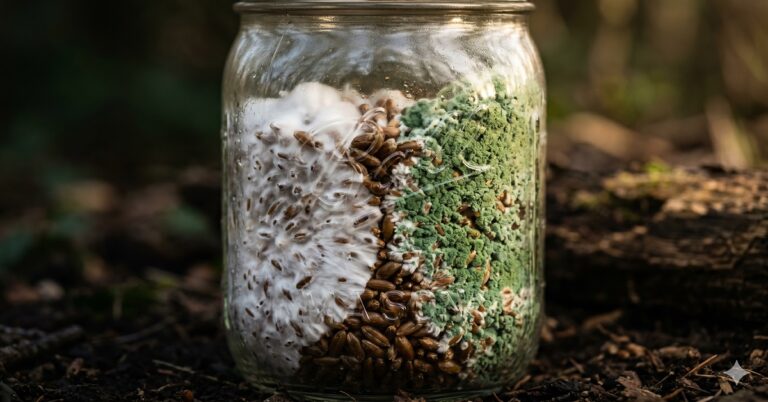
- Surface-wet grain in a sterilised jar creates puddles of condensation inside the jar. This free water is an anaerobic bacterial paradise — the exact conditions that favour Bacillus and cause the characteristic pink or yellow bacterial contamination that appears 3–6 days after inoculation.
- Interior-dry grain doesn’t hydrate the mycelium properly — colonisation is slow and uneven, and the grain may crack under pressure cooker heat.
- Correctly prepared grain at field capacity hydrates the mycelium readily while presenting no free water for bacterial growth.
The Two Hydration Methods
The Field Capacity Test for Grain
This is the test most grain spawn guides never mention — and it’s the single most important quality check before loading your jars. Do not skip it.
The Three-Step Field Capacity Test
If grain tests too wet: Spread on clean towels and dry at room temperature for another 30–60 minutes, testing again. Do not load jars until it passes. If grain tests too dry: Return to a pot with minimal water and simmer an additional 5–10 minutes, then re-drain and re-test.
Loading Jars and Sterilising
Jar Preparation
Use wide-mouth quart mason jars. Modify the lids by cutting a hole (3–4cm diameter) in the flat part of the lid, filling the hole with polypropylene fibrefill (polyfill) — the same material used in cushions — and covering with a layer of foil. The polyfill acts as a gas-exchange filter that allows CO₂ out and oxygen in while blocking airborne contaminants. This replaces the sealed lid that would cause pressure build-up.
Loading Amount
Fill each quart jar no more than 2/3 full — approximately 500–550g of prepared grain. Two-thirds capacity is critical for two reasons: (1) grain expands slightly during pressure cooking as remaining surface moisture becomes steam, and (2) after inoculation you’ll shake the jar repeatedly to distribute mycelium — this requires headspace for effective grain movement.
Sterilisation Protocol
- Pressure: 15 PSI — no less. 12 PSI is not sufficient for grain spawn sterilisation.
- Duration: 2.5 hours minimum for quart jars. 3 hours for pint jars loaded above 400g. 2 hours is the absolute minimum and only acceptable for small pint jars under 350g.
- Cool completely: Allow jars to cool in the pressure cooker overnight — minimum 12 hours, ideally 16–20 hours. Jars inoculated while still warm invite bacterial contamination regardless of technique.
Inoculation and Incubation
What to Inoculate With
Grain spawn can be inoculated from:
- Spore syringe: Slowest method — spores must germinate before colonisation begins. 2–3cc per quart jar.
- Liquid culture (LC) syringe: Much faster — mycelium is already active. 1–2cc per quart jar. Recommended for grain work.
- Grain-to-grain (G2G) transfer: The fastest method — transfer a small amount (1–2 tablespoons) of fully colonised grain into the new jar. Colonises in 7–10 days vs. 14–21 days for spores.
Inoculation Protocol
- Set up your still air box or flow hood and allow 15–20 minutes for air to settle.
- Spray all jar exteriors, your gloves, and the SAB interior with 70% IPA. Wipe down.
- Flame your needle until it glows red. Allow to cool for 3 seconds. Never touch anything with the cooled needle before insertion.
- Remove the foil and inject through the polyfill — no need to remove it. The needle passes through polyfill cleanly and the polyfill reseals around the puncture point.
- Replace foil immediately after injection. Shake the jar gently to distribute the liquid culture throughout the grain surface.
Incubation Conditions
- Temperature: 22–24°C. Above 28°C dramatically increases bacterial contamination risk.
- Darkness: Cover jars or place in a dark location.
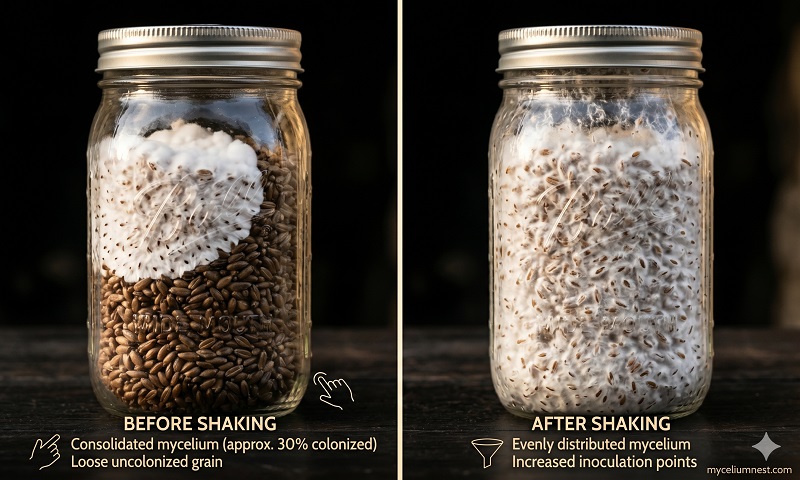
- Shake at 25–30% colonisation: When white mycelium covers roughly the top quarter of the grain, shake vigorously for 10–15 seconds to break up the colonised grain and redistribute it throughout the uncolonised grain. This dramatically speeds complete colonisation.
The Shake Test: Reading Your Colonisation Progress
Shaking grain spawn jars is the most misunderstood aspect of grain spawn production. Most beginners don’t shake at all — or shake too late. Here’s the exact protocol:
Grain Spawn Troubleshooting
The Smell Test: Diagnosing Grain Spawn by Scent Before You Can See the Problem
Experienced cultivators check their grain spawn by smell before they look at it. The smell of a grain jar tells you what’s happening inside often 24–48 hours before visible contamination appears — giving you time to isolate and remove a problem jar before it can spread spores to neighbouring jars. This sensory knowledge is one of the clearest markers of genuine cultivation experience.
Frequently Asked Questions
How long does colonised grain spawn stay viable?
Fully colonised grain spawn stored in a refrigerator at 4°C remains viable for 4–8 weeks for most species. Lion’s mane is less forgiving and should be used within 3 weeks. Oyster mushrooms can often be refrigerated up to 10 weeks before potency significantly declines. Signs of declining viability: the grain mass in the jar becomes hard and brittle rather than the soft, fluffy texture of fresh spawn. Always allow refrigerated spawn to return to room temperature (2–4 hours) before use.
Can I use cooked rice or oatmeal instead of whole grain?
Pre-cooked rice (cooked as you would for eating) can technically work as a spawn medium but is extremely difficult to prepare at the correct moisture content — it tends to be far too wet and sticky. Pre-cooked oatmeal has the same problem. Brown rice in jars (as used in PF Tek — see our PF Tek guide) is a special case designed around this issue, but it’s a different technique than grain spawn. For proper grain spawn, always start with dry whole grain and hydrate it yourself — the process outlined in this guide.
How do I know when grain spawn is ready to use?
Three indicators: (1) Visual — 100% white throughout the jar, no brown grain visible when you turn it in good light. (2) Structural — when you shake the jar, the grain mass moves as a single airy unit rather than loose individual kernels. The mycelium has knit the grains together into a network. (3) Smell — the jar smells clean and mushroomy, not sour, chemical, or ammonia-like. All three should be confirmed before transferring to bulk substrate. Premature transfer — before full colonisation — dramatically increases contamination risk in the bulk stage.
Why does my grain turn hard after pressure cooking?
Over-simmered grain (cooked too long before sterilisation) will partially burst and then harden when sterilised, creating a glassy, brittle texture. This dramatically reduces mycelium surface area and slows colonisation. The solution is to reduce simmer time — target 15–20 minutes for rye and wheat, pulling the grain when kernels are swollen and tender to the tooth (like al dente pasta) but not yet split or soft. Popcorn and corn are more forgiving because the harder hull resists over-cooking.
Disclosure: This article contains Amazon affiliate links. See our full disclosure.