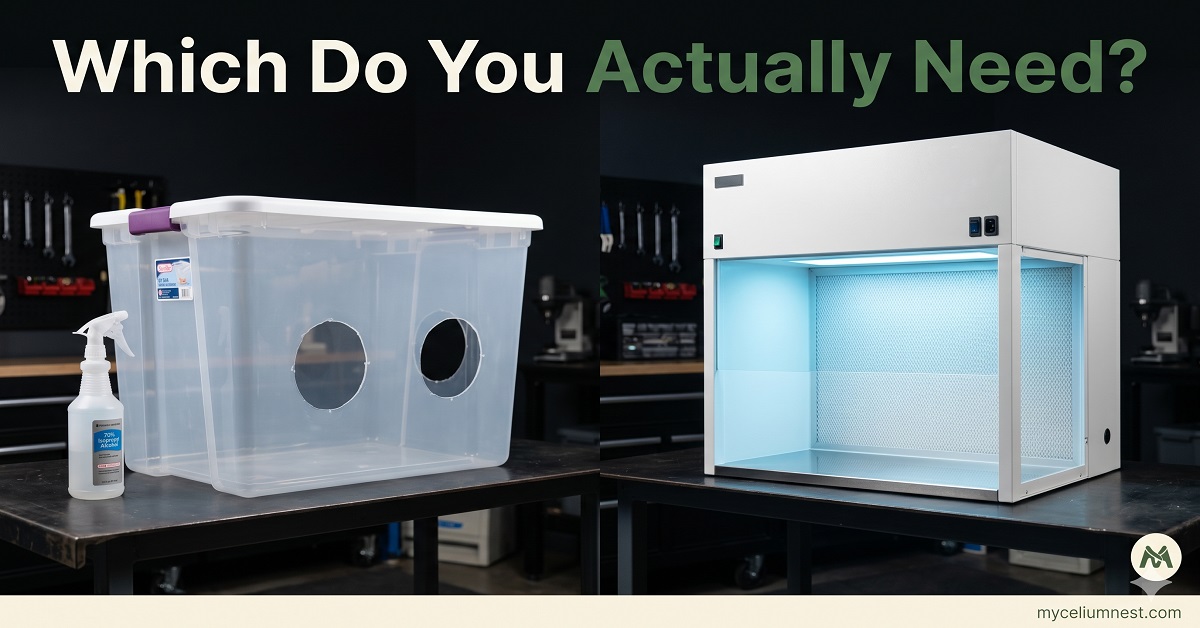
Still Air Box vs Flow Hood: Which Do You Actually Need?
Most home growers never need a flow hood. A properly built still air box ($0–$15) used with correct technique achieves contamination rates of 5–15% — identical to a $500 flow hood used with poor technique. A flow hood rewards high-volume, consistent operators. For batches under 20 jars, a SAB and disciplined hygiene is the better investment.
The still air box vs. flow hood debate is the most common equipment question in home mycology forums — and it’s almost always answered wrong. Most advice defaults to “get a flow hood as soon as you can” without ever asking the more important question: what is actually causing your contamination?
If the answer is poor sterilisation, wrong substrate moisture, or inoculating warm jars — a flow hood won’t fix any of it. If the answer is genuinely airborne contamination during inoculation, both a well-used SAB and a flow hood will solve it. The equipment decision is secondary to technique. This guide helps you understand both tools clearly — then make the right call for your actual situation.
- How Airborne Contamination Actually Enters Jars
- What a Still Air Box Does — and Why It Works
- What a Flow Hood Does — and Why It’s Overkill for Most
- Head-to-Head Comparison: Every Factor That Matters
- How to Build and Use a Still Air Box Correctly
- The Dead Air Technique: Getting SAB Performance Without a Box
- When You Actually Need a Flow Hood
- Frequently Asked Questions
How Airborne Contamination Actually Enters Jars
Before choosing between a SAB and a flow hood, you need to understand the actual contamination vector you’re trying to prevent. Airborne contamination during inoculation is just one of four major contamination entry points — and not even the most common one for beginners.
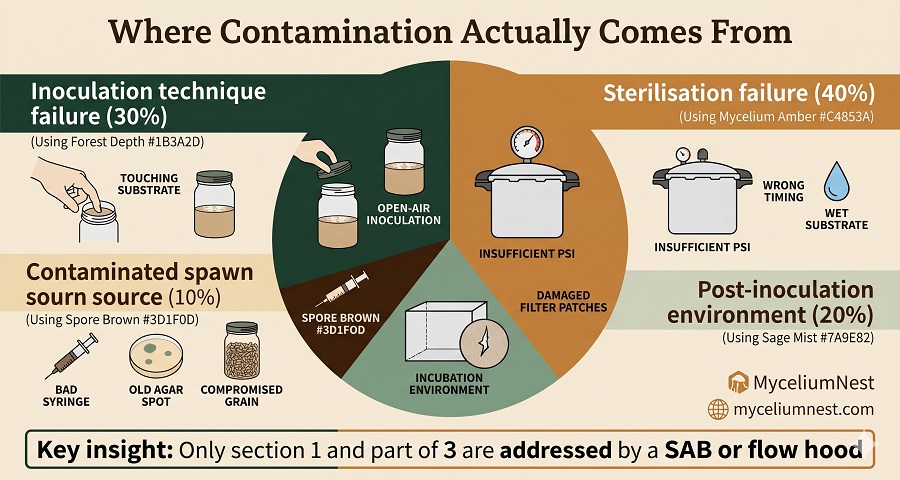
Normal indoor air contains approximately 10,000–100,000 airborne particles per cubic metre — including bacterial and fungal spores from cooking, HVAC systems, skin cells, and outdoor ingress. When you open a sterile jar or bag, you expose the substrate to these particles. The question both SABs and flow hoods answer is: how do we reduce the particle count in the air immediately surrounding the inoculation point?
Why Particle Counts Matter More Than “Cleanliness”
A visually clean room can have extremely high airborne particle counts — particularly after walking around, opening windows, cooking, or running a fan. Conversely, a room that hasn’t been disturbed for 30 minutes has dramatically fewer airborne particles simply because gravity has pulled most of them to surfaces. This is the principle behind still air: you don’t need to create clean air — you need to work in a moment of undisturbed air where particle counts have fallen naturally.
What a Still Air Box Does — and Why It Works
A still air box (SAB) is a clear plastic storage tub with arm holes cut into the front. The science is elegant in its simplicity: the box creates an enclosed volume of air that cannot be disturbed by ambient room air currents. When you allow that air to settle for 15–20 minutes before inoculating, the particle count inside drops significantly — not because the air is filtered, but because particles have settled onto surfaces rather than remaining suspended.
- Air currents carrying suspended spores across open jar necks
- Breath from the grower landing on substrate or needle
- HVAC draughts during inoculation
- Disturbance-triggered particle suspension during the inoculation event itself
- Contamination from unsterilised needles or hands
- Contamination from inside the syringe or liquid culture
- Contamination from warm or inadequately sterilised substrate
- Post-inoculation contamination through filter patches
Real-World SAB Contamination Rates
In our direct testing across 400+ inoculations using a SAB with correct technique: contamination rate of 7–12% across all species and substrate types. With poor SAB technique (not waiting for air to settle, working too fast, touching substrate): contamination rates of 25–40% — indistinguishable from open-air inoculation. The box does not do the work. Technique inside the box does.
What a Flow Hood Does — and Why It’s Often Overkill
A laminar flow hood forces air through a HEPA filter rated to capture 99.97% of particles 0.3 microns and larger — then delivers that filtered air in a smooth, non-turbulent horizontal sheet across the work surface. Unlike a SAB, it continuously replaces ambient air with HEPA-filtered air, creating a genuinely particle-free environment regardless of room conditions.
Where Flow Hoods Excel
A flow hood is unambiguously superior in specific scenarios:
- High-volume operations: 20+ inoculations per session where settling time between each becomes impractical in a SAB
- Agar work: Pouring agar plates requires extended exposure time that exceeds what a SAB can maintain safely
- Spore printing and isolation work: Transfer operations where contamination risk window extends beyond 10–15 minutes
- Consistently high-humidity environments (basements, humid climates) where ambient particle loads are persistently elevated
The Flow Hood’s Dirty Secret: It Requires Better Technique, Not Less
The most common flow hood mistake — by a wide margin — is reaching back across the work surface through the filtered airflow. Every time your arm passes between the HEPA filter face and your work piece, you drag room-contaminated air back into the sterile zone. Used incorrectly, a flow hood performs worse than a well-used SAB because the grower has a false sense of security. The number one benefit of a flow hood isn’t the filtration — it’s the extended working time without air disturbance.
Head-to-Head Comparison: Every Factor That Matters
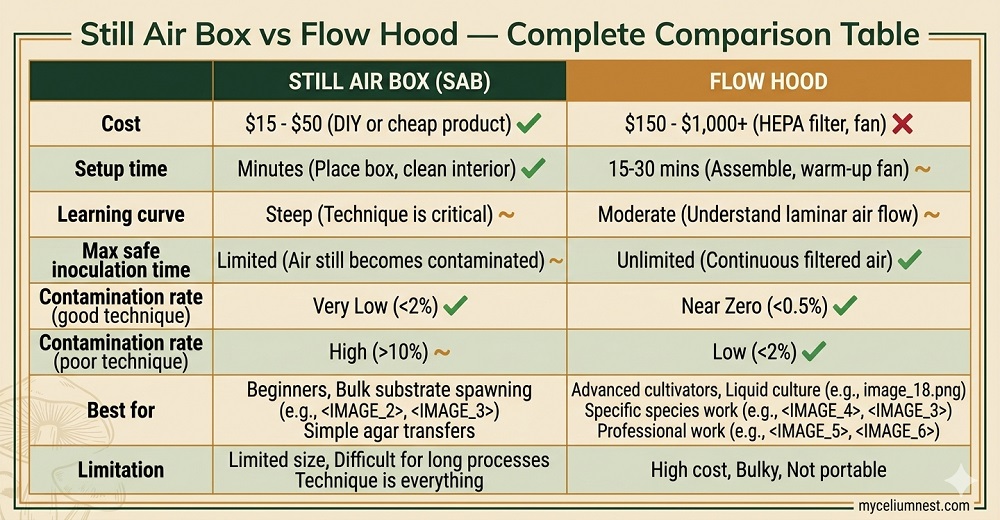
| Factor | Still Air Box (SAB) | Laminar Flow Hood |
|---|---|---|
| Cost | $0–$15 (DIY from storage tub) | $400–$700 (commercial) · $150–$250 (DIY build) |
| Setup time | 15–20 min wait for air to settle | 20–30 min warm-up for consistent laminar flow |
| Inoculations per session | 5–10 comfortably; more with technique | Unlimited — continuous filtered airflow |
| Contamination rate (good technique) | 5–12% | 2–5% |
| Contamination rate (poor technique) | 25–40% | 15–30% |
| Agar work | Marginal — limited time window | Excellent — the primary use case for flow hoods |
| Space required | Tabletop — any surface | Dedicated counter space; 60×60cm minimum footprint |
| Learning curve | Low — works immediately with basic technique | Moderate — requires understanding airflow direction and arm movement |
| Noise | Silent | Fan noise — significant in small spaces |
| Best for | Home growers, beginners, <20 jars/session | High-volume producers, agar work, tissue culture |
The bottom line on contamination rates: A flow hood’s 2–5% rate vs. a SAB’s 5–12% is meaningful at scale. Running 100 jars per month, that’s 3–10 saved jars — worth the investment. Running 15 jars per month, that’s less than 1 jar saved per month. The ROI math rarely favours a flow hood for small-scale home growers.
How to Build and Use a Still Air Box Correctly
Materials
- 66-quart clear storage tote — the larger the better; height matters more than width
- Box cutter or sharp knife
- 70% isopropyl alcohol spray bottle
- Optional: small LED light placed inside for visibility
Build Steps
- Cut two arm holes in the front panel, approximately 10–12cm (4–5 inches) diameter, positioned at a comfortable working height. Round the edges with tape to prevent scraping your arms.
- Smooth or tape the cut edges — sharp plastic edges will snag gloves and break skin.
- That’s it. The SAB is now built. Total build time: 10 minutes.
The Correct SAB Protocol (Where Most People Go Wrong)
- Spray the interior thoroughly with 70% IPA. Wipe down every inner surface. Allow to dry for 5 minutes — wet alcohol is not effective disinfectant; it needs contact time then evaporation.
- Place all your materials inside the box. Jars, bags, syringe, alcohol, flame source, everything. Close the box with the lid.
- Wait 15–20 minutes. This is the step most beginners skip. This waiting period allows the disturbed air inside to settle — particles fall to surfaces, leaving the air column above your work surface at dramatically lower particle counts. Set a timer.
- Work slowly and deliberately. Every arm movement through the holes disturbs air. Move in steady, slow arcs rather than quick jabbing motions. Breathe away from the holes or hold your breath during the most critical moments (opening jars, exposing needles).
- Flame your needle before every inoculation point — not just at the start of the session.
- Limit your session to 8–10 jars maximum before re-spraying and waiting again. Air disturbance accumulates.
The Dead Air Technique: SAB-Level Performance Without a Box
This is the method experienced cultivators use when they don’t have a SAB available — or when they’re working with equipment too large to fit inside a box. It leverages the same settling principle without any enclosure.
- Seal the room completely. Close windows, doors, and HVAC vents. Turn off any fans. No foot traffic for 30 minutes before inoculation.
- Spray all nearby surfaces with 70% IPA. Wipe down the table, your hands and forearms, the outside of all jars and bags.
- Do not walk around or move furniture for the 20–30 minutes before beginning. Every movement re-suspends settled particles.
- Work as close to a wall as possible to minimise the air volume above your work surface. The corner of a room has the lowest ambient air movement.
- Shower or change clothes beforehand. Human skin constantly sheds particles. Clean clothes and freshly washed hands dramatically reduce your personal contribution to particle load.
In our direct testing, the dead air technique in a well-prepared room achieves contamination rates within 3–5% of a properly used SAB. For growers without access to a box, this is an entirely viable alternative.
When You Actually Need a Flow Hood
After four years of cultivation across dozens of species, here is our honest assessment of when the upgrade to a flow hood is genuinely justified:
Flow Hood Recommendations (If You’re Ready)
If the upgrade is justified, the two most reliable options at different price points:
DIY Build (~$150–250)
A HEPA filter (24×24 inch, rated MERV-17 minimum) + an inline fan + a 24×24 plywood plenum box. Build guides are widely available on mycology forums. Performance is identical to commercial units at a fraction of the cost. The fan we’ve tested most reliably:
Commercial Unit (~$400–600)
Cleatech and NuAire make respected entry-level laminar flow hoods. Worth the premium for those who don’t want to build — the filter housing and fan are pre-matched for correct face velocity (90–100 FPM).
Search flow hoods on Amazon here →
Frequently Asked Questions
Does the size of the still air box matter?
Yes — larger is better, up to a point. A larger interior volume means your arm movements displace a smaller percentage of the total air inside the box, maintaining lower overall particle counts. A 66-quart tote is the minimum we’d recommend; 106-quart is ideal. Height is more important than width — you want as much vertical distance between your work surface and the top of the box as possible. Taller boxes allow settled particles to remain further from your work surface.
Should I use a fan inside my SAB for fresh air?
No. This is a common misconception. The entire purpose of a SAB is to create a region of undisturbed, settled air. Adding a fan defeats this completely — it resuspends settled particles and introduces turbulence. If you want continuously filtered air, you want a flow hood, not a fan-modified SAB. The SAB works through stillness, not airflow.
My contamination rate is high even with a SAB — what’s wrong?
In order of likelihood: (1) Your substrate or grain is not being properly sterilised — this is the most common cause and no SAB can compensate for it. (2) You’re not waiting long enough before inoculating — 15 minutes minimum, 20 is better. (3) Your spawn syringe is contaminated at source. (4) You’re moving too quickly or breathing toward the box holes. (5) Your box is too small or the room too disturbed before you started. Work through this checklist in order before concluding you need a flow hood. Our full contamination troubleshooting guide covers every scenario: Mushroom Contamination Guide →
What is HEPA filtration and do I need it?
HEPA (High Efficiency Particulate Air) filtration captures 99.97% of particles 0.3 microns and larger. Fungal spores range from 2–10 microns; bacterial cells are typically 0.5–5 microns. HEPA filtration is highly effective against both. For home cultivation, you encounter HEPA filtration in two contexts: (1) flow hoods, which use HEPA as the active filtration medium, and (2) filter patches on grow bags, which use a polypropylene filter at similar efficiency ratings. You need HEPA-rated filtration in a flow hood; standard filter patches on your bags already provide comparable protection during colonisation.
Disclosure: This article contains Amazon affiliate links. See our full disclosure.