How to Grow Portobello Mushrooms at Home: The Complete Honest Guide

How to grow Portobello Mushrooms – Agaricus bisporus (the species behind button mushrooms, crimini, and portobello) is grown on every mushroom farm in the world — but it’s not beginner-friendly for home growers. It requires a casing layer, specific compost chemistry, and CO₂ management that differs from all other species. Master it and you’ll grow the most familiar and commercially valuable mushroom in existence.
Why Portobello Is a Different Beast
Most mushroom cultivation guides treat all species as roughly equivalent — choose your species, prepare substrate, inoculate, fruit. Portobello (Agaricus bisporus) breaks this model in three important ways:
Difference 1: Compost, Not Hardwood
Agaricus bisporus is a saprotrophic species that evolved to decompose manure-enriched compost — not wood. It cannot efficiently decompose lignin (the primary component of hardwood substrates). Growing portobello on HWFP or Master Mix fails — not because of contamination, but because the mycelium simply cannot access the nutrients. You need a composted substrate with high nitrogen content and specific microbial pre-conditioning.
Difference 2: The Casing Layer Is Not Optional
Every other cultivated mushroom species discussed on this site will pin without a casing layer. Agaricus bisporus will not. A casing layer — a thin topping of pH-adjusted peat/limestone or coconut coir mixture — is biologically required to trigger pinning initiation. This is not a technique preference; it is the confirmed mechanism by which Agaricus begins fruiting, involving volatile compound exchanges between the casing microbiome and the mycelium.
Difference 3: CO₂ Management Inverted
Pearl oyster and lion’s mane need high FAE to prevent CO₂ buildup. Agaricus bisporus needs a specific CO₂ concentration — too high inhibits pinning; too low reduces yield. Commercial mushroom farms carefully control CO₂ at 800–1,500 ppm during spawn run and flush it down to 400–600 ppm to trigger pinning. Home growers approximate this with a room-temperature temperature break and increased ventilation at the pinning stage.
The Compost Substrate
Commercial mushroom compost (Phase II compost) is the correct substrate for home portobello production. You have two options:
Sourcing Shortcut: How to Get Free (or Nearly Free) Phase II Compost From Commercial Farms
There is a third option that most guides never mention — and it’s often better than buying pre-made compost and dramatically easier than making your own: Spent Mushroom Substrate (SMS) from a local commercial mushroom farm.
What Spent Mushroom Substrate Is
When a commercial mushroom farm finishes its production cycles from a batch of Agaricus bisporus compost, the spent substrate — which has been through full spawn run and multiple fruiting cycles — is removed and replaced. This SMS is a waste product for the farm. For home growers, it is:
- Already pH-balanced at 6.5–7.0 from the lime applied during commercial production
- Already conditioned with the established microbial community that triggers Agaricus pinning — this is the microbiome that many home growers fail to establish with sterile peat
- Still contains residual nutrition sufficient for 1–3 additional home flushes when re-spawned
- Available free or for a nominal transport fee from farms that need to dispose of it
How to Find Local SMS Sources
The Spawn Run Phase
Unlike wood-decomposing species, portobello spawn run works in a specific way:
- Fill your growing tray (a standard 1/2 hotel pan, a wooden mushroom tray, or any shallow container 15–20cm deep) with pre-made mushroom compost to a depth of 10–12cm.
- Mix grain spawn throughout the compost at a rate of approximately 10–15% by weight. Unlike bag growing where spawn sits on top, Agaricus spawn is mixed through the entire compost depth — this distributes inoculation points throughout the substrate.
- Cover with damp newspaper or cardboard to maintain surface moisture during the spawn run. Change if it dries out.
- Incubate at 24–27°C — slightly warmer than most species’ spawn run. Spawn run takes 10–14 days. Signs of complete spawn run: white mycelium visible at the surface and throughout the compost when you probe gently with a clean utensil.
The Casing Layer: The Critical Non-Negotiable Step
Once the spawn run is complete, the casing layer is applied immediately. This is the step that most guides underexplain and most home failures can be traced back to.
The Peat/Limestone Casing Formula
The industry-standard casing mixture: 3 parts sphagnum peat moss + 1 part hydrated garden lime (calcium carbonate) + water to 70% moisture. The lime raises the peat’s pH from its natural 3.5–4.0 to a neutral 6.5–7.0, which is required for Agaricus pinning initiation. Peat alone (pH 3.5) will not trigger pinning consistently regardless of all other conditions.
Casing Application Protocol
- Pasteurise the casing mix: heat to 82°C for 1 hour in a covered pot, then cool completely before use
- Apply 2.5–3.5cm (1–1.5 inches) of casing mix evenly over the entire compost surface
- Do not mix casing into the compost — it goes on top as a separate layer
- Mist the casing surface lightly to settle it; it should be moist but not waterlogged
- Cover again with damp newspaper for 4–5 days while the casing layer equilibrates
Alternative casing: Rinsed coconut coir + hydrated lime (3:1 ratio) performs equally well and is easier to find in some regions. The pH target remains 6.5–7.0 — test with a simple pH meter or strips before applying.
Triggering Pinning: Temperature Break & CO₂ Flush
After the casing layer equilibration (4–5 days post-application), apply the pinning trigger:
- Drop temperature from 24–27°C to 16–18°C. This temperature break is the primary pinning signal. In a home setting: move the tray to a cool room, unheated basement, or refrigerator anteroom. A consistent 16–18°C for 5–7 days is the target.
- Flush CO₂. Remove the newspaper cover and significantly increase ventilation — open a window, run a fan on the room (not directly on the tray). This represents the CO₂ concentration drop that in nature signals open-air conditions favourable for spore dispersal.
- Maintain high humidity. Mist the casing surface once or twice daily. RH target: 85–90%. Under-misting is the most common cause of pin abort at this stage — the small developing pins are extremely sensitive to surface desiccation.
Pins should appear 5–10 days after the temperature break and CO₂ flush. They will look like tiny white pins that grow rapidly into button mushrooms over 4–7 days.
Harvest Timing: Before the Veil Breaks
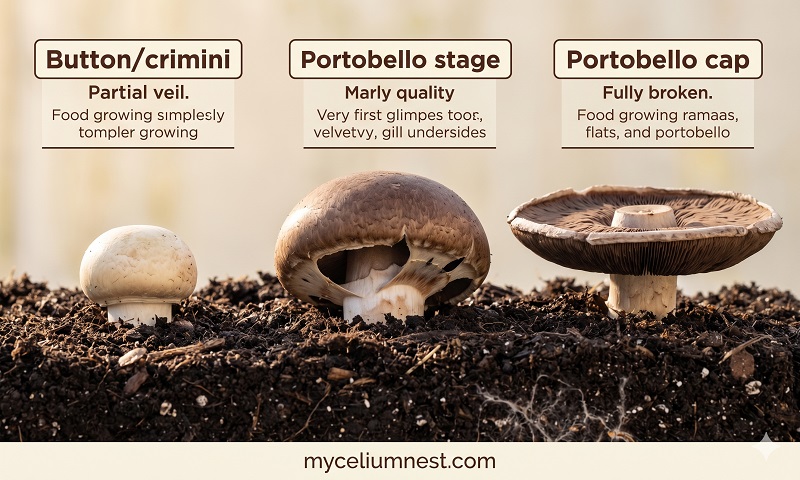
Portobello, crimini, and button mushrooms are all the same species (Agaricus bisporus) at different stages of maturity — harvested at different times for different culinary purposes:
The veil break is the critical timing signal: harvest portobello just as the veil (the thin membrane connecting the cap edge to the stem) begins to tear but before it separates completely. At this stage flavour is at maximum and shelf life is still adequate. An over-mature portobello releasing black spore deposits contaminates the casing surface, inhibiting subsequent flushes. Harvest promptly.
For cooking ideas, see our portobello mushroom recipes guide. For fruiting conditions across all species, see our complete fruiting conditions reference.
Frequently Asked Questions
Can I grow portobello from a grocery store portobello?
Not reliably. Commercial portobello strains are often hybrid varieties selected for yield and shelf life rather than spawn viability. Tissue culture from a store-bought portobello typically produces low-vigour mycelium. Commercially available Agaricus bisporus grain spawn — from reputable suppliers — is a more reliable starting point and costs less than $15 for enough spawn to fill multiple trays. The genetics in commercial spawn are specifically selected for home and commercial cultivation productivity.
How many flushes will I get from one tray?
A well-managed compost tray typically produces 3–5 flushes over 8–12 weeks. After each flush, remove spent stems and any over-mature mushrooms, allow the casing to rest for 7–10 days at spawn-run temperature (24–27°C), then reapply the temperature break and CO₂ flush to trigger the next flush. Later flushes produce smaller mushrooms but the cumulative yield across all flushes is significant — typically 20–35% of the compost weight in total mushroom harvest.
Is a grow kit worth it for portobello?
Yes — for a first portobello grow, a pre-made portobello/button mushroom grow kit removes all the substrate chemistry complexity and lets you focus on learning the casing layer and pinning trigger without the added variables. Our grow kit review covers portobello kits. After a successful kit grow, you’ll have the tactile reference to attempt scratch production with purchased compost and spawn.
Disclosure: This article contains Amazon affiliate links. See our full disclosure.
Similar Posts
Liquid Culture for Mushroom Growing: The Complete Guide
Written by the MyceliumNest Team Liquid culture for mushroom growing: Liquid culture changed our operation more than any other technique upgrade. The colonisation speed improvement, the ability to expand genetics indefinitely from a single clean culture, and the economics of LC vs. buying syringes repeatedly — this guide covers all of it from direct experience….
How to Make Grain Spawn: The Complete Step-by-Step Guide
Written by the MyceliumNest Team We’ve made grain spawn across six grain types, three pressure cooker models, and multiple species over 4+ years. The failure modes and solutions in this guide come from direct experience — including the batches that taught us what not to do. What You Need to Know First Grain spawn failures…
How to Grow Lion’s Mane Mushrooms Indoors (No Experience Required)
Written by the MyceliumNest Team 4+ years growing lion’s mane through multiple substrate formulations and fruiting environments. This guide reflects our direct cultivation experience and cross-references published mycology literature. Lion’s mane mushrooms (Hericium erinaceus) are one of the most extraordinary fungi you can grow at home — and one of the most misunderstood in terms…
How to Grow Oyster Mushrooms at Home: The Complete Step-by-Step Guide
Written by the MyceliumNest Team 4+ years cultivating 12+ mushroom species · Active member, North American Mycological Association · Every technique in this guide has been personally tested and validated. Oyster mushrooms (Pleurotus ostreatus) are the single best mushroom for any first-time home grower — and it’s not even close. They colonise faster than almost…
Master Mix Mushroom Substrate: The Complete Recipe, Science & Species Guide
Written by the MyceliumNest Team Master Mix is the substrate we use for lion’s mane and high-yield oyster production in our own grows. The ratio modifications, contamination risk gradient, and species adaptations in this guide come from direct testing across 80+ Master Mix blocks. Master Mix Mushroom Substrate: The Master Mix Formula 50% Hardwood Fuel…