Oyster Mushroom Substrate: The Best Options & How to Pasteurize Straw at Home
Wheat straw and hardwood fuel pellets (HWFP) are the two best substrates for home oyster mushroom growing — both cheap, widely available, and capable of biological efficiency ratios above 100%. Hardwood pellets are slightly easier for beginners (less mess, simpler preparation); straw produces higher yields per kilogram of substrate at lower cost. Read on as we guide you on the best substrate for growing oyster mushrooms.
The substrate is the growing medium that your oyster mushroom mycelium colonises and feeds from. Choosing the right substrate — and preparing it correctly — is one of the most important factors determining your yield, contamination rate, and the number of productive flushes you get from each block.
Unlike shiitake or lion’s mane — which have strict hardwood requirements — oyster mushrooms are ligninolytic generalists capable of colonising a wide range of agricultural by-products and cellulosic materials. This flexibility is one of the reasons oyster mushrooms are the most cultivated mushroom in the world by volume. But “can colonise” and “performs best on” are not the same thing — and this guide explains the difference.
Substrate Basics: What Oyster Mycelium Needs
Oyster mushrooms (Pleurotus species) are primary decomposers — in nature they grow on dead and dying wood, breaking down lignin, cellulose, and hemicellulose. Any cultivation substrate needs to provide three things:
- Carbon source: Lignin, cellulose, and hemicellulose — the structural components of plant cell walls. Found in straw, hardwood, cardboard, cotton waste, coffee grounds, etc.
- Nitrogen balance: C:N ratio of approximately 40:1 to 80:1. Too high in nitrogen encourages bacterial contamination; too low slows colonisation. Straw’s natural C:N ratio is near-ideal for oyster mushrooms without supplementation.
- Correct moisture content: 65–70% field capacity. This single factor is responsible for more contamination and yield failures than any other.
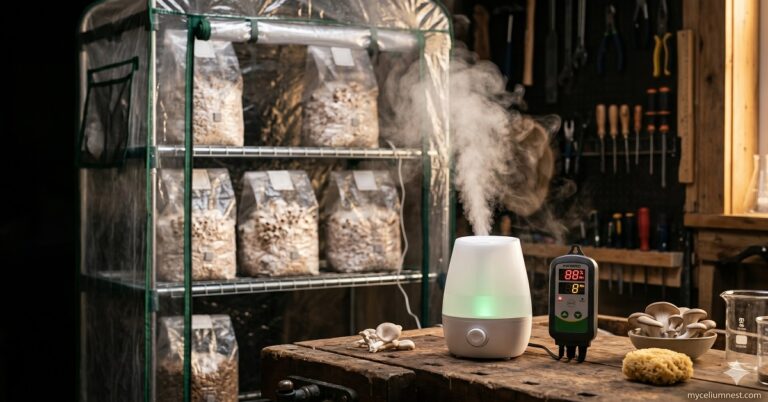
Oyster mushrooms do not require sterilisation on most substrates — pasteurisation is sufficient. This is a key advantage over lion’s mane or shiitake on supplemented hardwood, which require full sterilisation at 121°C. To understand the full growing process that this substrate feeds into, read our complete oyster mushroom growing guide.
The 4 Best Oyster Mushroom Substrates
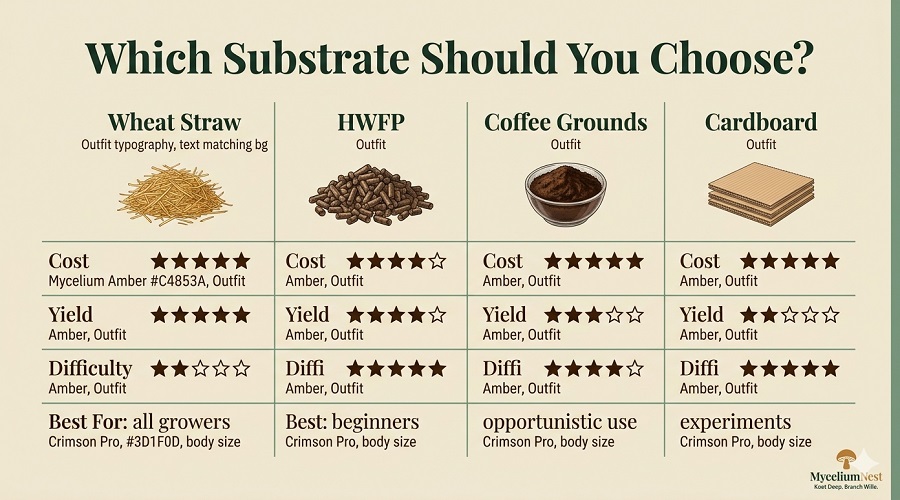
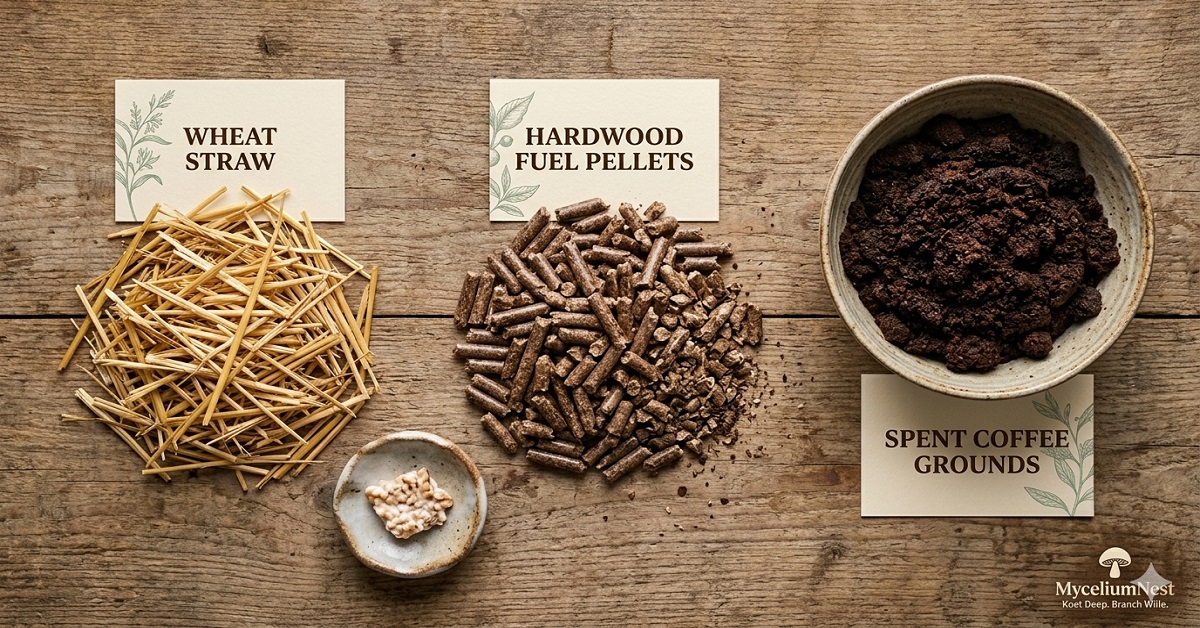
1. Wheat Straw — The Gold Standard
Wheat straw is the substrate used in commercial oyster mushroom operations worldwide for good reason. It’s:
- Cheap — available at farm supply and feed stores for $5–10 per bale
- Naturally near-ideal C:N ratio for oyster mushrooms
- Capable of biological efficiency (BE) ratios above 100% (producing more fresh mushroom weight than the dry substrate weight)
- Produces 3–5 productive flushes per block
The limitation: Straw requires chopping (3–5 inch pieces), pasteurisation, and thorough draining — more labour than HWFP preparation. The loose, fibrous material is also messier to work with than compressed pellets.
Where to buy: Farm supply stores (Tractor Supply, local feed stores) or Amazon in pre-cut form for smaller quantities.
2. Hardwood Fuel Pellets (HWFP) — Best for Beginners
Hardwood fuel pellets are compressed hardwood sawdust pellets designed as home heating fuel. When hydrated with hot water, they break apart into loose sawdust — a substrate that is:
- Already partially heat-treated at the pellet manufacturing stage (this isn’t full pasteurisation, but does reduce initial contamination load)
- Extremely simple to prepare — just add boiling water and wait
- Consistent in texture and moisture content once prepared
- Inexpensive — typically $5–8 per 40lb bag at hardware stores or available on Amazon
- Clean to handle — no fibrous mess of straw
Key requirement: Pure hardwood only — no pine, cedar, softwood, or additives. These contain resins and terpenes that are toxic to oyster mycelium. Read labels carefully: “hardwood” must be the only listed ingredient.
3. Spent Coffee Grounds — The Opportunistic Substrate
Spent coffee grounds are already partially sterilised by the brewing process, making them a contamination-resistant substrate for quick grows. They’re free if you generate large quantities (or can collect from a local café). However:
- Yields are 30–50% lower than straw — grounds exhaust faster
- Use within 24 hours of brewing — grounds mould rapidly once cooled
- Best blended with straw or cardboard at no more than 50% by weight
- Not recommended as a primary substrate for serious production
4. Cardboard — Experimental and Educational
Cardboard (corrugated, ink-free) is colonised successfully by oyster mycelium — an excellent demonstration of the organism’s range. Yields are low and the substrate exhausts quickly (1–2 flushes maximum). Best used as an educational grow or to demonstrate colonisation to beginners, not for production growing.
How to Pasteurise Straw: 3 Methods
Pasteurisation heats the substrate to a temperature range (65–82°C) that kills most competing bacteria and moulds while leaving the substrate’s beneficial micro-ecosystem intact. Unlike sterilisation (which kills everything, including beneficial organisms), pasteurisation gives oyster mycelium a competitive advantage — its aggressive colonisation outcompetes whatever minimal contamination load remains.
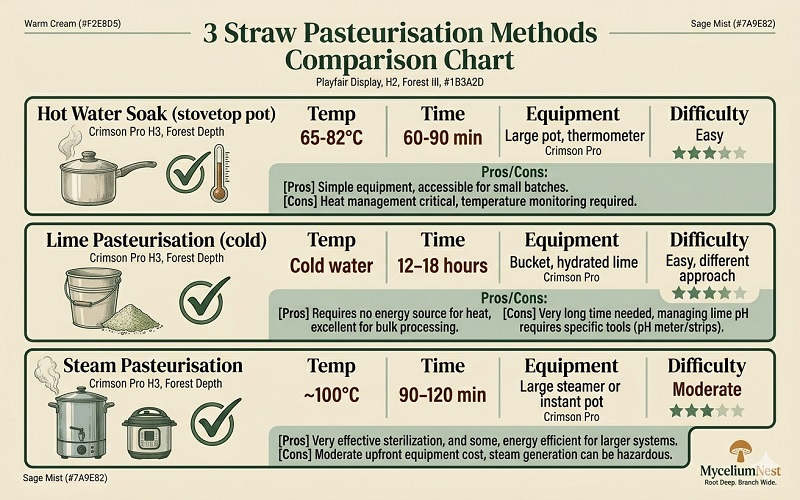
Method 1: Hot Water Soak (Most Common)
- Chop straw into 3–5 inch pieces using scissors or a hay chopper
- Submerge completely in a large pot of water heated to 65–82°C (150–180°F). Use a thermometer — too hot (above 82°C) begins killing beneficial organisms; too cool (below 65°C) is ineffective
- Weigh the straw down to keep it submerged (a plate or pot lid works)
- Hold at temperature for 60–90 minutes, checking temperature every 15–20 minutes
- Drain thoroughly in a colander or mesh bag. Allow to cool to below 30°C before inoculating — never inoculate warm substrate; heat kills your spawn
Method 2: Hydrated Lime Pasteurisation (No Heat Required)
Hydrated lime (calcium hydroxide) raises substrate pH to approximately 12, creating an environment hostile to most competing fungi and bacteria while not significantly harming the substrate structure. This is widely used by commercial growers and is excellent for large batches.
- Dissolve 1 tablespoon hydrated lime (calcium hydroxide, not garden lime) per gallon of water in a large food-grade bucket. Wear gloves — lime is caustic.
- Submerge chopped straw completely in the lime water
- Hold for 12–18 hours at room temperature. The high pH does the pasteurisation work — no heat needed
- Drain thoroughly. The lime residue buffers the substrate slightly alkaline, which many growers believe improves mycelium establishment
- Rinse with clean water, drain again, and inoculate once pH drops toward neutral (test with pH strips if desired; aim for 7–8)
Method 3: Steam Pasteurisation
Pack straw loosely into a large steamer basket or Instant Pot. Steam at approximately 100°C for 90–120 minutes. This is hotter than the ideal pasteurisation range but produces reliable results for small batches. Allow to cool completely before inoculating.
How to Prepare Hardwood Fuel Pellets
- Measure pellets: 850g of dry HWFP per block is a good starting point (approximately enough for one 5lb grow bag)
- Add boiling water: Pour 1.4–1.6 litres of boiling water over the pellets. The boiling water both hydrates and pasteurises simultaneously
- Cover and rest: Cover the container with a plate or cling wrap and leave for 30–60 minutes. The pellets will fully absorb the water and break apart into loose sawdust
- Check field capacity: Stir thoroughly to ensure even hydration. Test field capacity — a firm handful should clump together and release only 1–2 drops of water when squeezed hard. If dripping freely, it’s too wet; add a handful of dry pellets and mix again
- Cool completely: Allow to reach room temperature (below 30°C) before inoculating. This typically takes 4–6 hours for a large batch
Mastering Field Capacity: The Most Common Mistake
Substrate that is too wet is the single most common cause of bacterial contamination in home growing. Bacteria thrive in waterlogged, anaerobic conditions. Too dry substrate slows colonisation dramatically and reduces yield. Field capacity — approximately 65–70% moisture — is the sweet spot.
The Squeeze Test (No Equipment Needed)
Take a firm handful of prepared substrate and squeeze it hard. The result tells you everything:
Substrate Yield Comparison
Is Growing Your Own Oyster Mushrooms Worth It? The Real Numbers
One of the most common questions we receive is whether home cultivation is actually economically worthwhile — especially for small-batch home growers. The answer depends on your setup, your location, and how many flushes you extract per block. Here’s the full calculation based on our direct growing data.
Break-Even Analysis: When Does Home Growing Pay for Itself?
Average total yield: 590g / 3 flushes
Equivalent store cost (Whole Foods): $15.50/lb × 1.3lb = $20.15
Savings per kit: −$4.85 (vs Whole Foods price)
Break-even vs. farmers market (at $20/lb): saves $5.89/kit
Per-grow cost (substrate + spawn): ~$8
Average yield: 800g–1.2kg / 3–5 flushes
Equivalent store cost: $26–40 at Whole Foods prices
Savings per grow: $18–32 per cycle
Equipment paid off after: 3–5 grows
But the economics miss the most important point
The mushrooms you grow and harvest minutes before eating are nutritionally and gastronomically in a completely different category from anything purchased commercially. Oyster mushrooms begin losing moisture, glycogen, and volatile aromatic compounds within hours of harvest. A cluster pulled from your fruiting chamber and cooked within 30 minutes has a depth of flavour, a tenderness of texture, and a richness of aroma that no refrigerated commercial product can match. That quality difference is worth more than any cost calculation.
Frequently Asked Questions
Do I need to sterilise straw for oyster mushrooms?
No — pasteurisation (65–82°C for 60–90 minutes) is sufficient for oyster mushrooms on straw. Sterilisation (121°C / 15 PSI) is necessary for lion’s mane and shiitake on supplemented hardwood, because the richer nutrients in supplemented substrate support bacterial growth more readily. Oyster mycelium is competitive enough to succeed on pasteurised straw without needing a fully sterile substrate.
Can I reuse substrate from a previous grow?
Not recommended for straw — exhausted straw harbours high contamination loads after multiple flushes and reinfection risk is very high. Some growers successfully use spent straw or HWFP substrate as a bulk substrate amendment (mixing 20–30% spent substrate with fresh), but this increases contamination risk and is not advised for beginners. Spent substrate makes excellent garden compost.
Can I use pine shavings or softwood bedding as substrate?
No. Pine, cedar, and softwood shavings contain terpenes and resins that are inhibitory to oyster mycelium. Never use softwood sawdust, shavings, or pellets for mushroom cultivation. Always specify hardwood (oak, beech, maple, alder) and verify there are no additives. If buying heating pellets, confirm the bag states “100% hardwood” with no binders, accelerants, or softwood content.
What’s the best substrate for growing oyster mushrooms in bags?
For the standard mushroom growing bag setup (filter patch bags, 3–5lb capacity), pasteurised wheat straw or rehydrated HWFP are both excellent. Straw packs into bags very well and the loose fibrous structure allows mycelium to spread rapidly. HWFP packs more densely — leave slightly more headspace than you would with straw. Both are excellent choices for the 5B and 10B Unicorn Bag formats, available on Amazon here. For our full equipment guide, see the best mushroom growing bags review.
Disclosure: This article contains Amazon affiliate links. We earn a small commission at no extra cost to you. See our full disclosure.