How to Grow Oyster Mushrooms at Home: The Complete Step-by-Step Guide
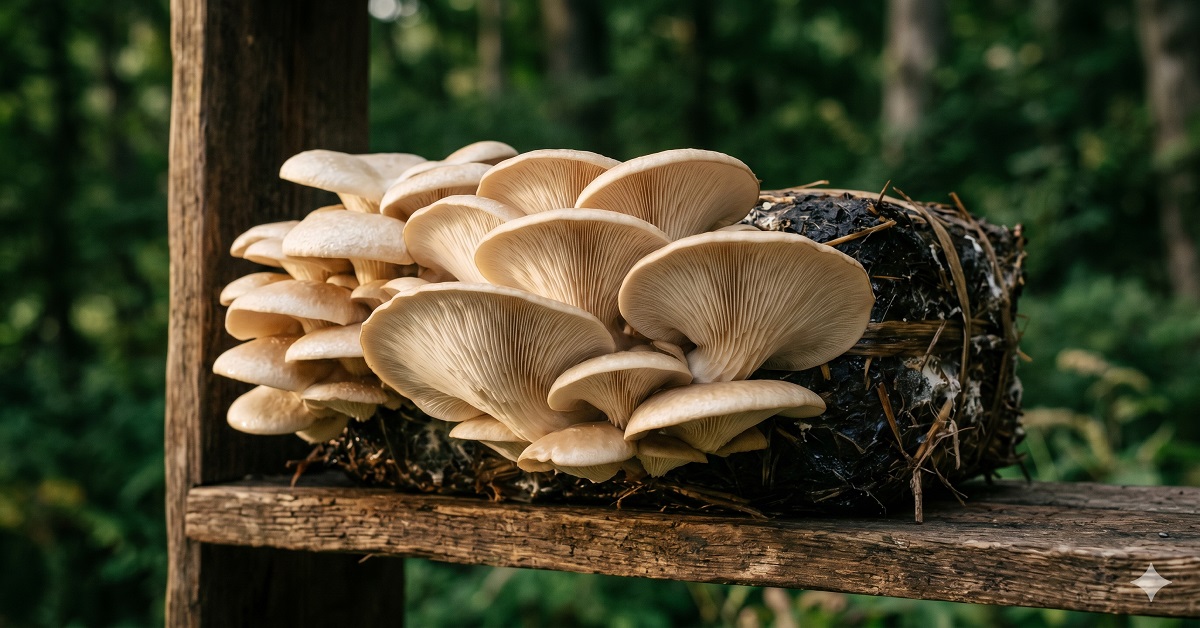
Oyster mushrooms (Pleurotus ostreatus) are the single best mushroom for any first-time home grower — and it’s not even close. They colonise faster than almost any other edible species, tolerate beginner mistakes better than shiitake or lion’s mane, and can produce a full harvest of beautiful, restaurant-quality mushrooms within 10 to 14 days of inoculation.
This guide covers everything you need to know about how to grow oyster mushrooms at home — from choosing the right substrate and spawn, through incubation and fruiting, to harvesting and triggering second and third flushes. By the end, you’ll have everything needed to complete your first successful grow.
Why Oyster Mushrooms Are the Perfect Beginner Species
If you’ve been researching how to grow mushrooms at home, you’ve probably noticed that the mycology community almost universally recommends oyster mushrooms as the starting point. There are very good reasons for this consensus.
They Are Aggressively Competitive
Oyster mycelium is one of the fastest-colonising fungi in cultivation. Under ideal conditions, a pasteurised straw block fully colonised within 7 to 12 days. This speed matters enormously for beginners because speed is your best defence against contamination. A block that colonises in 8 days gives green mould (Trichoderma) far less time to establish than one that takes 3 weeks.
They Tolerate Substrate Variation
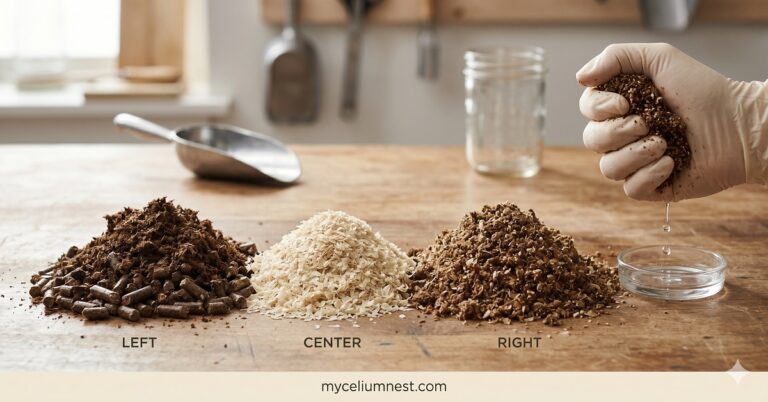
While other species require meticulously specific substrate formulations, pearl oyster mushrooms thrive on everything from pasteurised wheat straw to cardboard to hardwood fuel pellets to spent coffee grounds. This flexibility means your first grow doesn’t require perfect execution — it requires good enough execution.
The Yield Is Genuinely Impressive
A properly managed straw log or hardwood block can produce 200–400g of fresh oyster mushrooms per kilogram of dry substrate — across multiple flushes. That’s an efficiency ratio that hobby growers of other species can only dream about.
They Are Delicious
Pearl oyster mushrooms have a mild, slightly sweet flavour with a satisfying meaty texture. They’re one of the most versatile culinary mushrooms in existence — and when you’ve grown them yourself and harvested them at peak, they taste incomparably better than anything from a supermarket. Browse our oyster mushroom recipes for inspiration on what to cook with your first harvest.
What You’ll Need: The Complete Materials List
Before you start, gather everything below. Most experienced growers recommend having your entire setup ready before opening any spawn — this reduces the window for contamination.
Option A: Starting With a Grow Kit (Easiest — Recommended for Absolute Beginners)
A fully colonised oyster mushroom grow kit removes the hardest steps entirely — the substrate preparation, sterilisation, and inoculation are already done. You simply open the bag, introduce fresh air and humidity, and wait for pins.
We’ve tested over a dozen kits and consistently recommend North Spore’s Pearl Oyster Kit — it uses organic straw substrate, produces reliable pins within 7–10 days, and the customer support is outstanding for troubleshooting beginners. If you’d rather compare options first, see our best mushroom grow kits guide for a full breakdown.
Option B: Growing From Scratch (More Control, Higher Yield)
Materials List — Growing Oyster Mushrooms From Scratch
Substrate
- Wheat or rice straw (bale or pre-cut)
- Or hardwood fuel pellets (HWFP) — easier and cleaner
- Optional: gypsum (1% of dry weight, improves structure)
Spawn & Containers
- Pearl oyster grain spawn or plug spawn
- Mushroom growing bags (4–5 lb capacity) with filter patches
- Rubber gloves and 70% isopropyl alcohol spray
Pasteurisation Equipment
- Large stockpot (12+ quart) or a 5-gallon bucket with lid
- Thermometer (kitchen probe type)
- Heat source — stove or outdoor burner
Fruiting Environment
- Digital hygrometer + thermometer combo
- Ultrasonic humidifier (for Martha Tent setup)
- Spray bottle for manual misting
For mushroom growing bags, use filter-patch bags with a 0.2-micron filter — these allow gas exchange during colonisation while blocking contaminants. We recommend Unicorn Bags 10B series, available via Amazon here.
Choosing and Preparing Your Oyster Mushroom Substrate
The substrate is the growing medium your oyster mushroom mycelium will colonise and feed on. Unlike shiitake or lion’s mane — which require specific hardwood formulations — oyster mushrooms are ligninolytic decomposers capable of breaking down a wide range of agricultural by-products.
For a complete breakdown of substrate options, nutritional amendments, and pasteurisation methods for each, read our dedicated oyster mushroom substrate guide. Here’s a summary of the two best options for beginners:
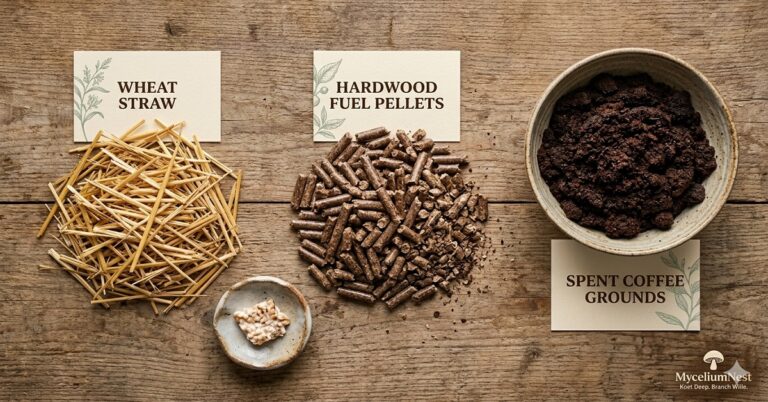
Option 1: Wheat Straw (Traditional, Cheap, Excellent Yield)
Why Straw Works So Well
Wheat straw is the substrate used in commercial oyster mushroom operations worldwide. It’s cheap, accessible at any feed or farming supply store, and pasteurises (not sterilises) very easily. Oyster mycelium has evolved to colonise straw — it’s genuinely the natural choice.
How to Pasteurise Wheat Straw
- Chop straw into 3–5 inch pieces (scissors or a straw chopper)
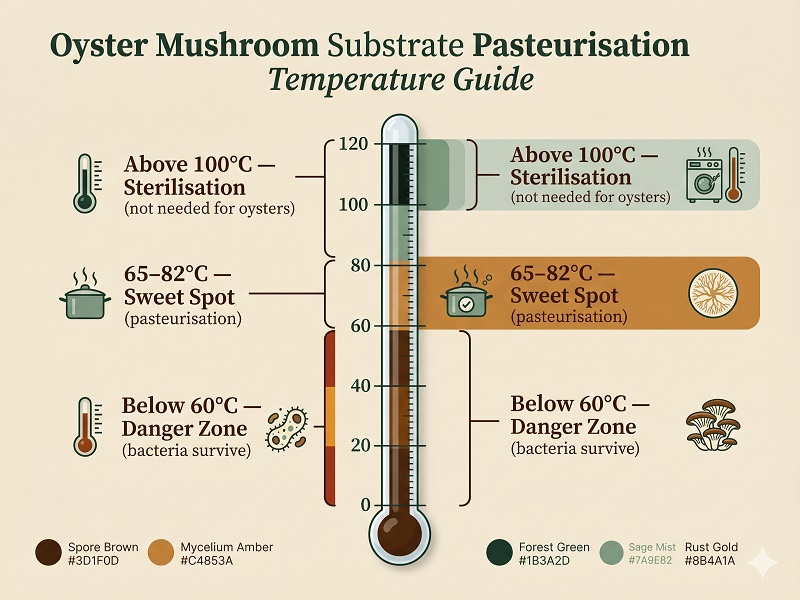
- Submerge completely in water heated to 65–82°C (150–180°F) — not boiling
- Hold at temperature for 60–90 minutes
- Drain thoroughly and allow to cool to below 30°C (86°F) before inoculating
- Squeeze a handful — it should feel moist but release no more than a drop or two when wrung hard
Target moisture content: 65–70%. Too wet encourages bacterial contamination; too dry slows colonisation dramatically.
Option 2: Hardwood Fuel Pellets (HWFP) — The Beginner’s Secret Weapon
Hardwood fuel pellets (also called HWFP) are compressed hardwood sawdust pellets sold as heating fuel. When hydrated, they break apart into loose sawdust — an excellent, already-pasteurised-at-manufacture substrate that’s perfectly suited for oyster mushrooms.
How to Prepare HWFP
- Add 850g HWFP to a bowl or tray
- Pour 1.5–2 litres of boiling water over the pellets
- Cover and rest for 30–60 minutes until pellets fully break down into loose sawdust
- Allow to cool to room temperature before inoculating
- The field capacity should be 65–70% — moist but not dripping
HWFP are available at hardware stores, garden centres, or on Amazon. Ensure you buy pure hardwood pellets with no additives, accelerants, or softwood (pine/cedar) content — these contain compounds that inhibit mycelium growth.
Step-by-Step: How to Grow Oyster Mushrooms at Home (5 Stages)
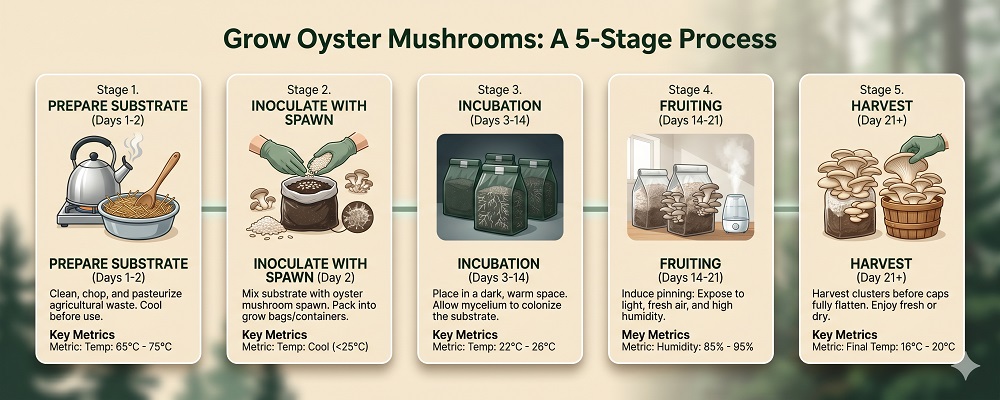
Stage 1: Inoculation (Day 1–2)
Inoculation is the process of mixing your prepared substrate with mushroom spawn. This is where contamination risk is highest — work quickly and cleanly.
Before You Start
Wipe down your work surface with 70% isopropyl alcohol. Wear nitrile gloves. Have your bags open and ready before you open the spawn bag.
The Inoculation Process
- Mix spawn into cooled substrate at a rate of 10–15% of the total dry weight — higher spawn rate means faster colonisation and more competition against contaminants
- Mix thoroughly — every part of the substrate should contact spawn
- Pack firmly into your growing bags, leaving 3–4 inches of headspace
- Seal the bags — fold the top over twice and secure with a rubber band, or use an impulse sealer
- Use a clean knife or skewer to punch 4–6 small holes (3mm diameter) in the sides and top of the bag — these are your future fruiting sites
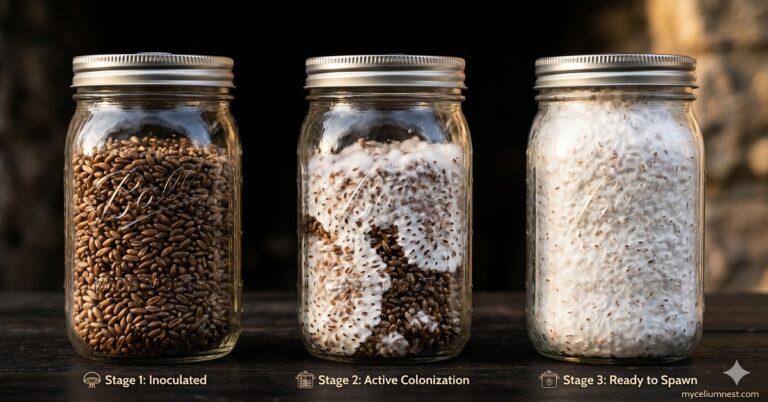
Stage 2: Incubation (Days 2–14)
Incubation is the colonisation phase. Your bags sit in a dark, warm location while the mycelium spreads through the substrate. This is the most passive stage — your main job is monitoring temperature and watching for contamination.
Ideal Incubation Conditions
72–82°F. Cooler slows colonisation; hotter risks bacterial contamination.
Light is not needed during incubation. Any location out of direct sunlight works.
Pearl oyster typically colonises in 7–12 days at 24°C. King oyster may take 14–18.
What You Should See
White, cottony or rope-like mycelium spreading from the spawn points through the substrate. A healthy bag smells faintly mushroomy or like fresh earth. Any green, black, or pink discolouration indicates contamination — see our mushroom contamination guide for diagnosis and response steps.
When Incubation is Complete
The bag should be fully white — from top to bottom, corner to corner — with no visible substrate colour showing through. Some bags will show small “metabolic heat” areas that appear slightly yellow or golden. This is normal and indicates healthy, active mycelium.
Stage 3: Triggering Fruiting (Days 14–16)
Once fully colonised, oyster mushrooms need an environmental shift to trigger pinning. This “fruiting trigger” involves three key changes from the incubation environment. For a full explanation of why each condition matters, read our guide to mushroom fruiting conditions.
The Fruiting Trigger (Three Changes)
- Lower the temperature to 15–22°C (59–72°F). A drop of 5–10°C from your incubation temperature is ideal. Many growers simply move the bags from their incubation location to a cooler room.
- Introduce fresh air exchange (FAE). Open or enlarge the holes in your bag. The CO₂ buildup during incubation must now flush out. Oxygen triggers pin formation.
- Raise humidity to 85–95%. Begin misting the outside of the bag and the surrounding area 2–3 times daily, or set up an automatic humidifier.
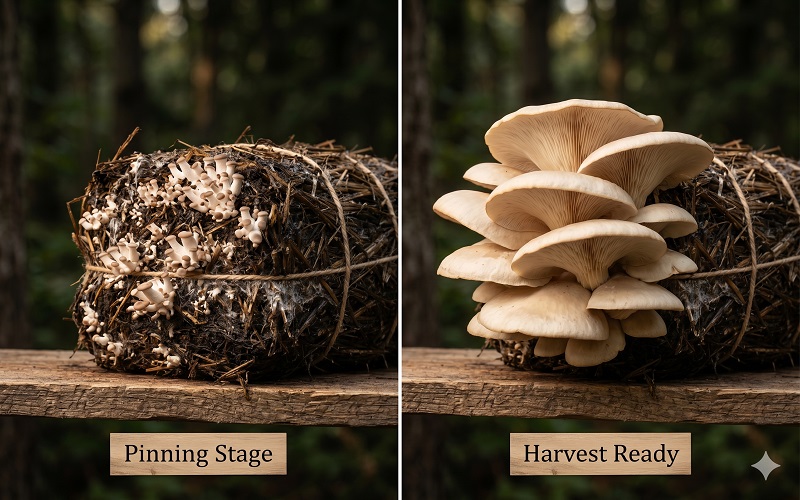
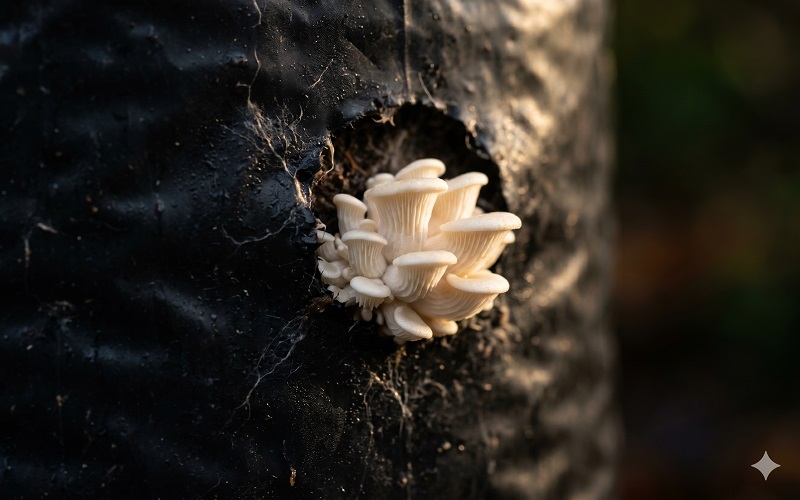
When to Expect Pins
Under good fruiting conditions, pearl oyster pins typically appear within 3–7 days of the trigger. You’ll see tiny white dots appearing at your bag holes and any natural breaks in the substrate. Within 24 hours of appearing, pins grow with remarkable speed.
Stage 4: Growing and Monitoring (Days 16–21)
Once pins have formed, your main job is maintaining the fruiting environment. Oyster mushrooms at the pinning stage are vulnerable to drying out — humidity drops below 80% can cause caps to crack or pins to abort.
Daily Fruiting Maintenance
- Mist the walls of your fruiting space (not directly onto the mushrooms) 2–3 times daily
- Ensure fresh air exchange — open a window briefly or use a small fan on a timer pointed away from the block
- Keep temperature in the 15–22°C range — lower temperatures produce meatier, thicker caps
- Check for any signs of contamination on the exposed substrate
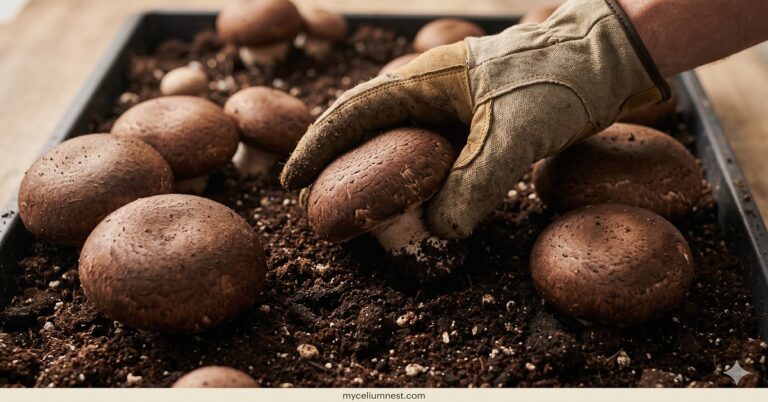
Stage 5: Harvesting (Day 18–21+)
Harvest timing is critical. Oyster mushrooms should be picked just as the cap edges begin to flatten and turn slightly upward — before any part of the cap curls up or the edges start to look wavy. The caps should still be slightly curved downward at the edges.
Why Harvest Timing Matters
An over-mature oyster mushroom — where the cap has fully flattened or is starting to curl upward — begins to release spores. This makes the air in your growing space very spore-heavy (which can cause respiratory irritation in sensitive individuals) and dramatically reduces the storage life of the mushrooms. Harvest one day early rather than one day late.
How to Harvest Correctly
- Grip the base of the entire cluster firmly
- Twist while pulling — the entire cluster should come off cleanly in one piece
- Do not leave stub remnants attached to the block — these will rot and become contamination entry points
- Clean any substrate debris from the harvest site with a clean cloth dampened with water
Fresh oyster mushrooms store in the refrigerator for 5–7 days wrapped loosely in a paper bag (never in an airtight container — they need to breathe). For recipe ideas using your harvest, explore our oyster mushroom recipes.
Spore Management: What Indoor Growers Need to Know
Oyster mushrooms are among the heaviest spore-producers of all cultivated species. An over-mature cluster releasing spores can fill a small room with spore clouds visible to the naked eye — like a fine white or light-coloured dust. People with asthma, mushroom allergies, or respiratory sensitivities should take the precautions below seriously. Even healthy individuals can experience mild respiratory irritation with prolonged exposure to heavy spore loads.
Why Oyster Mushroom Spores Matter
When oyster mushroom caps fully flatten and begin to curl upward at the edges, the mushroom has entered active spore dispersal. Each mature oyster mushroom can release billions of spores over a 24–72 hour period. In an outdoor or well-ventilated environment, this dispersal is harmless and ecologically valuable. In a small, poorly-ventilated indoor growing space — a spare bedroom, closet grow tent, or bathroom — the spore concentration can become significant enough to cause:
- Mild respiratory irritation (itchy throat, mild coughing) in otherwise healthy individuals
- More significant reactions in people with mould allergies or asthma — oyster mushroom spores are in the same size range as common allergenic moulds
- Skin or eye irritation if handling over-mature mushrooms without protection
- White or cream-coloured “dust” visible on surfaces near the fruiting area — this is spore deposit and an indicator of significant release
The Five Spore Management Strategies
The most effective strategy. Harvest oyster mushrooms while the cap edges are still slightly curved downward — before they begin to flatten. This eliminates spore release almost entirely and produces a superior mushroom with better shelf life.
Open a window or run an air purifier with a HEPA filter in your growing space during the fruiting phase. A HEPA filter captures spores effectively (they’re 3–9 microns — well within HEPA filtration range). This is especially important in the 48–72 hours before harvest.
Growing in an enclosed tent with filtered exhaust (carbon filter + inline fan) contains spores within the tent. The exhaust fan passes air through the carbon filter before releasing into the room. This is the professional indoor growing standard and eliminates ambient spore exposure entirely. See our fruiting chamber guide.
White or cream-coloured powder on surfaces near your grow is a spore deposit indicator. If you notice this, your mushrooms are over-mature — harvest immediately and add early-harvest timing to your routine. Wipe down surfaces with a damp cloth after harvesting late mushrooms.
Second Flush: Getting More From the Same Block
After the first harvest, your block is far from finished. A well-prepared oyster block will typically produce 3–5 flushes, with the first two being the largest.
Rest Period After First Flush
After harvesting, give the block a rest period of 5–10 days. During this time:
- Reduce misting to once daily
- Keep the block in a cooler, darker location
- Remove any spent mushroom stumps from the block surface
The Cold Shock Method (Recommended for Second Flush)
After the rest period, submerge the entire block in cold water (10–15°C) for 4–8 hours. This rehydrates the substrate, which loses significant moisture during the first flush, and provides a fresh fruiting trigger. Remove from water, drain, and return to fruiting conditions. Pins typically appear within 5–10 days.
| Block Size (dry weight) | Cold Soak Duration | Water Temp | Expected Weight Gain | Result |
|---|---|---|---|---|
| 0.5 – 1 kg | 2–4 hours | 8–15°C (cold tap) | +80–150ml | Grow kit or small kit |
| 1 – 2 kg | 4–6 hours | 8–15°C | +150–250ml | Standard home grow bag |
| 2 – 3 kg | 6–8 hours | 8–15°C | +250–400ml | Large straw log or 5lb bag |
| 3 – 5 kg | 8–12 hours | 8–15°C | +400–700ml | Bulk grow / multiple blocks |
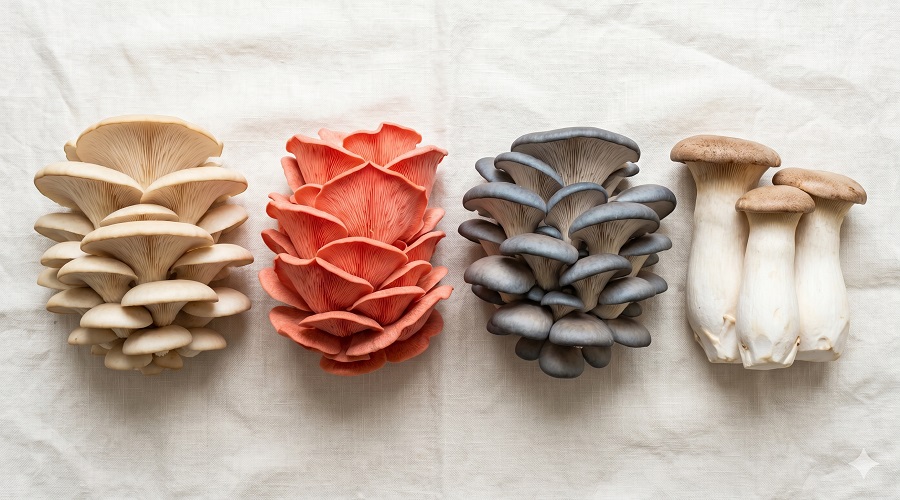
Oyster Mushroom Varieties: Which to Grow First
| Variety | Difficulty | Pin Temp | Yield | Flavour |
|---|---|---|---|---|
| Pearl Oyster (P. ostreatus) | ★☆☆☆ Easiest | 10–21°C | Very High | Mild, versatile |
| Pink Oyster (P. djamor) | ★☆☆☆ Easiest | 18–30°C | Very High | Mild, slightly floral |
| Blue Oyster (P. ostreatus var. columbinus) | ★★☆☆ Easy | 10–18°C | High | Richer, pronounced |
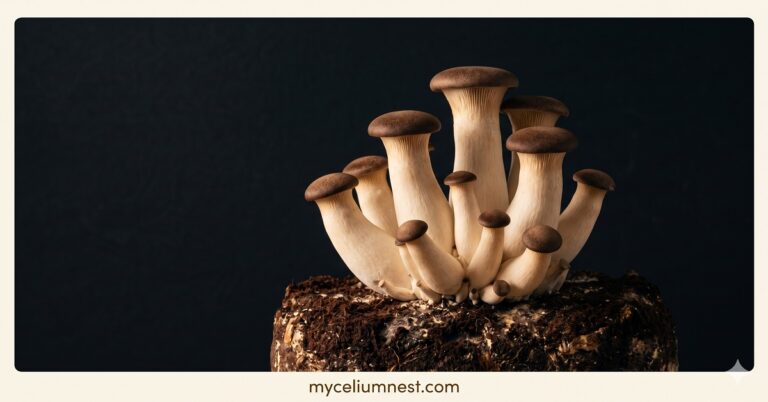
| King Oyster (P. eryngii) | ★★★☆ Intermediate | 10–18°C | Moderate | Umami-rich, meaty |
Recommendation for first-time growers: Start with Pearl Oyster. It’s the most forgiving of temperature swings, colonises fastest, and produces the most impressive yields. Once you’ve completed two successful flushes, explore Pink Oyster (for warm climates) or Blue Oyster (for cooler environments) as your second project. Learn how to grow king oyster mushrooms in our dedicated king oyster growing guide.
Common Problems and How to Fix Them
Problem: Green Mould Appearing on the Substrate
Cause: Trichoderma contamination — the most common issue in mushroom cultivation. Usually introduced during inoculation or through the bag holes during fruiting.
Solution: Isolate the contaminated bag immediately — do not open it indoors. Dispose of it in a sealed plastic bag in an outdoor bin. Review your inoculation hygiene: clean surfaces, gloves, isopropyl alcohol before handling spawn. Read our complete mushroom contamination guide for a full diagnosis and prevention protocol.
Problem: Fully White but No Pins After 7+ Days of Fruiting Trigger
Cause: Usually one or more of: insufficient FAE (CO₂ too high), humidity below 80%, or temperature outside the optimal range.
Solution: Increase air exchange by enlarging the holes in your bag. Verify humidity with a hygrometer — if you don’t have one, a digital hygrometer/thermometer combo is an essential investment under $15. Review our guide to fruiting conditions for species-specific parameters.
Problem: Pins Are Drying Out Before Developing
Cause: Humidity dropping below 75–80%, or a direct airflow across the fruiting block drying the surface.
Solution: Mist more frequently. Point any fans away from the block rather than directly at it. Consider building a simple shotgun fruiting chamber to maintain a more stable microclimate around your blocks.
Problem: Mushrooms Developing Long, Thin Stems with Small Caps
Cause: Elevated CO₂ levels — insufficient fresh air exchange.
Solution: Increase FAE. Enlarging the bag holes is the simplest fix. Oyster mushrooms develop their characteristic fan shape in low CO₂ environments — in high CO₂, they grow long and lanky, reaching for oxygen.
How long does it take to grow oyster mushrooms from scratch?
From substrate preparation to first harvest, expect 18–28 days for pearl oyster mushrooms at optimal temperatures. The timeline breaks down roughly as: 1–2 days (substrate prep and inoculation) + 7–14 days (incubation) + 3–7 days (pinning) + 2–5 days (fruit body development). A grow kit skips the first two phases — expect 7–10 days from opening the kit to harvest.
Do I need a pressure cooker to grow oyster mushrooms?
No — this is one of the key advantages of oyster mushrooms over species like shiitake or lion’s mane. Oyster mycelium is aggressive enough that pasteurisation (65–82°C for 1 hour) is sufficient rather than full sterilisation. You don’t need a pressure cooker for oyster mushrooms on straw or HWFP substrate.
A large stockpot and a thermometer is all you need. How many flushes can I expect from one block?
A healthy oyster mushroom block will typically produce 3–5 flushes before the substrate is exhausted. The first two flushes are usually the largest. Each subsequent flush is smaller as the available nutrients are depleted. Many growers report the third flush having a more intense flavour than the first — the block concentrates its energy into a smaller fruiting body. After the final flush, the exhausted substrate makes excellent compost or can be used as a garden amendment.
Can I grow oyster mushrooms on coffee grounds?
Yes — spent coffee grounds are a viable oyster mushroom substrate, particularly convenient for people who generate large volumes of grounds from a café or office environment. Coffee grounds are already partially sterilised by the brewing process, which reduces contamination risk. However, yields are generally lower than straw or HWFP, and the blocks tend to fatigue after 1–2 flushes rather than 3–5. Coffee grounds work best blended with straw or cardboard at a ratio of no more than 50% grounds by weight.
What temperature do oyster mushrooms fruit at?
Pearl oyster mushrooms are remarkably temperature-tolerant during fruiting, which is another reason they’re ideal for beginners. The ideal fruiting range is 15–22°C (59–72°F). They will produce at temperatures as low as 10°C (produces dense, meaty caps) or as high as 26°C (produces thinner caps, faster but smaller). Pink oysters prefer warmer conditions — 18–30°C — making them better suited to grow in summer months or warm climates.
Is growing mushrooms at home legal?
Growing culinary and functional mushroom species — including oyster, shiitake, lion’s mane, reishi, and all other edible varieties covered on this site — is completely legal everywhere in the United States, Canada, UK, Europe, and Australia. There are no legal restrictions on cultivating edible species for personal consumption. Growing psilocybin mushrooms is a separate matter entirely and is not covered by MyceliumNest.
How much does it cost to grow oyster mushrooms at home?
A basic first grow from scratch — straw substrate, grain spawn, and growing bags — costs approximately $20–$40 USD and can produce 400–800g of fresh oyster mushrooms. A grow kit costs $18–$35 and typically produces 200–400g from 2–3 flushes. If you want to scale up to a proper fruiting chamber setup, expect an initial investment of $50–$100 in equipment that will last for years. The ongoing per-grow cost drops significantly once you have your substrate, bags, and spawn sourcing dialled in.
Where can I buy oyster mushroom spawn?
Reputable grain spawn sources for oyster mushrooms include North Spore, Fungi Perfecti (Paul Stamets’ company), and Field & Forest Products — all ship to most US addresses. Amazon also carries spawn from several vendors — look for oyster mushroom grain spawn with recent reviews confirming successful colonisation. Grain spawn has a shelf life of 2–6 months refrigerated; always check the production date before ordering.
Disclosure: This article contains affiliate links to Amazon. If you purchase through our links, we earn a small commission at no extra cost to you. This does not affect our recommendations — see our full affiliate disclosure.