Written by the MyceliumNest Team
We have built three different cultivation operations over four years — from first grow kit to a 20-block monthly production. This guide shows the logical buying progression and what genuinely matters at each stage versus what beginners waste money on.
Mushroom Growing Supplies – The Equipment Progression Truth
The most common beginner mistake is buying intermediate or advanced equipment before mastering fundamental technique. A flow hood and a pressure cooker cannot compensate for poor substrate preparation or wrong inoculation technique. Every dollar you spend on equipment should follow — not precede — demonstrated proficiency at the level below. This guide is structured around that progression. See our complete beginner’s guide for the starting pathway.
| Level |
Footprint |
Equipment $ |
Monthly Yield |
Cost/100g |
Apartment Friendly? |
| Level 1 — Kit | 1 sq ft counter space | $0 | 300–600g/kit | $7–15 | ✓ Perfect |
| Level 2 — Straw | 2–4 sq ft (shelf/closet) | $40–80 | 500g–1kg | $1.50–3.00 | ✓ Yes (with humidity management) |
| Level 3 — Grain Spawn | 4–9 sq ft (closet/corner) | $150–250 | 1–3kg | $1.00–2.40 | ⚠ Possible (see apartment guide) |
| Level 4 — Full System | 9–16 sq ft (dedicated room/large closet) | $350–700 | 3–8kg | $0.50–1.60 | ✗ Requires dedicated space |
For Apartment & Small-Space Growers
The Apartment Cultivation Stack: Level 3 in 6 Square Feet
Most apartment growers stop at Level 2 because they assume Level 3 requires a room. It does not. A standard walk-in closet (6 sq ft), a small hallway cupboard, or a large wardrobe can house a complete Level 3 operation producing 1–3kg of mushrooms monthly.
The Apartment-Optimised Setup
- Closet-scale Martha tent (2-tier, not 4-tier) — 60×30×90cm footprint
- Pressure cooker on kitchen stove — no dedicated lab space required
- Still Air Box in bathtub during inoculation — most stable still-air environment in any apartment
- 4–8 blocks maximum — small batches reduce contamination risk and fit the space
The Apartment-Specific Considerations
- Spore management is critical — see grow tent guide for HEPA filtration protocol. Pearl oyster spores in an enclosed apartment can cause respiratory irritation at scale.
- Odour control — some substrates have a mild agricultural smell during colonisation. A closet with a carbon filter on the exhaust prevents this from permeating living spaces.
- Pressure cooker noise — 90-minute sterilisation cycles. Kitchen timing and neighbour awareness matter in apartment settings.
Level 1: Beginner Kit ($0–$50) — Your First 3 Months
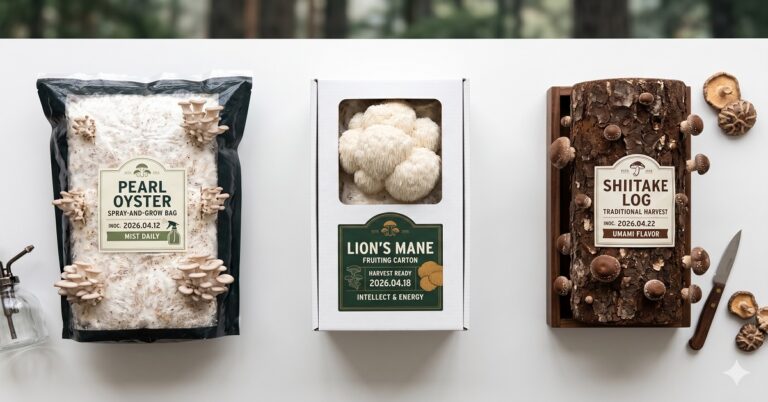
At this stage you need zero cultivation equipment. Your first three mushroom experiences should come from commercially produced grow kits — complete inoculated substrate blocks that require nothing but humidity management and a spray bottle. This phase teaches you: what healthy colonisation looks like, correct harvest timing, humidity management basics, and species-specific fruiting requirements.
Level 1 Shopping List — Everything You Need
2–3 Grow Kits — Pearl oyster first, then lion’s mane or shiitake. $25–45 each from North Spore or Back to the Roots.
Full guide →
Spray Bottle ($3–5) — Clean, dedicated to mushroom misting. Do not share with cleaning product use.
Nothing else. That’s genuinely the complete Level 1 list. Resist all other purchases until you’ve completed 3 kit grows.
Level 2: Scratch Grower ($50–$150) — First Oyster Grows on Pasteurised Straw
Level 2 System Components
SYSTEM COMPONENT: Substrate Pasteurisation
Large Stockpot or Brewing Kettle (20L+)
Role in system: Heats water to 75–82°C for hot water pasteurisation
of straw substrate. Dedicated pot prevents soap contamination
from kitchen use. Not interchangeable with your cooking pots.
Check Price →
SYSTEM COMPONENT: Temperature Verification
Digital Probe Thermometer
Role in system: Confirms pasteurisation temperature at the core
of the straw mass — not just at the water surface. Surface
readings are unreliable; core temperature is what eliminates
competitor moulds and bacteria. Target: 75–82°C held for 90 minutes.
Check Price →
SYSTEM COMPONENT: Mycelium Source
Oyster Mushroom Grain Spawn (North Spore / Field & Forest)
Role in system: The inoculant that colonises your pasteurised
substrate. Grain spawn colonises straw faster than sawdust spawn
due to greater surface contact points. Source only from reputable
suppliers — contaminated spawn ruins the batch before it begins.
Check Price →
SYSTEM COMPONENT: Inoculation Hygiene
70% Isopropyl Alcohol + Dedicated Spray Bottle
Role in system: Wipes down all surfaces, tools, and gloved hands
immediately before inoculation contact. 70% concentration is
more effective than 90%+ — the water content aids membrane
penetration of the alcohol. Dedicated bottle prevents
cross-contamination from cleaning products.
Check Price →
SYSTEM COMPONENT: Substrate Container
5-Gallon Bucket with Drilled Holes (DIY)
Role in system: Holds inoculated straw substrate during
colonisation and fruiting. 1cm holes drilled in a grid pattern
allow gas exchange and provide fruiting sites for oyster
mushroom pinning. The most cost-effective fruiting vessel
available — $3–5 versus $15–25 for commercial equivalents.
Check Price →
Level 3: Intermediate ($150–$350) — Grain Spawn & Hardwood Blocks
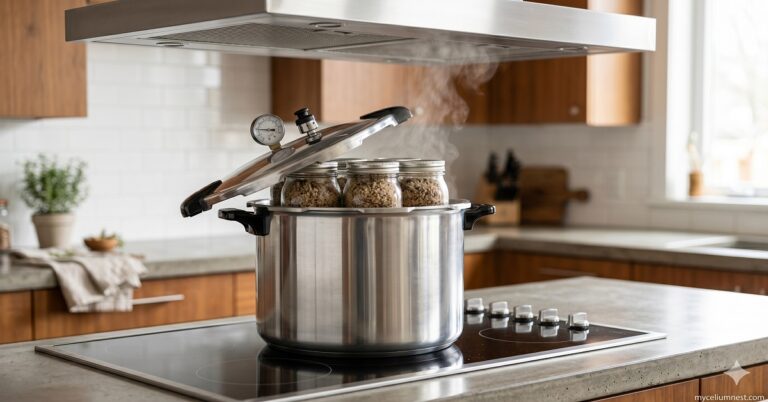
This level introduces sterilisation — meaning you genuinely need a 15 PSI pressure cooker. This is the level where most growers either invest correctly and develop a reliable system, or cut corners and experience persistent contamination. Penn State Extension’s mushroom cultivation resources provide supporting science for sterilisation protocols.
Level 3 System Components
★ PRIORITY SYSTEM COMPONENT: Sterilisation
Presto 23-Quart Pressure Canner
Role in system: Reaches and sustains 15 PSI / 121°C — the
threshold that kills all bacterial endospores including
Bacillus and
Trichoderma that survive
pasteurisation. Irreplaceable at Level 3+. Every other Level 3
component is secondary to this purchase. Full guide and
alternatives:
pressure cooker rankings →
Check Price →
SYSTEM COMPONENT: Contamination Prevention
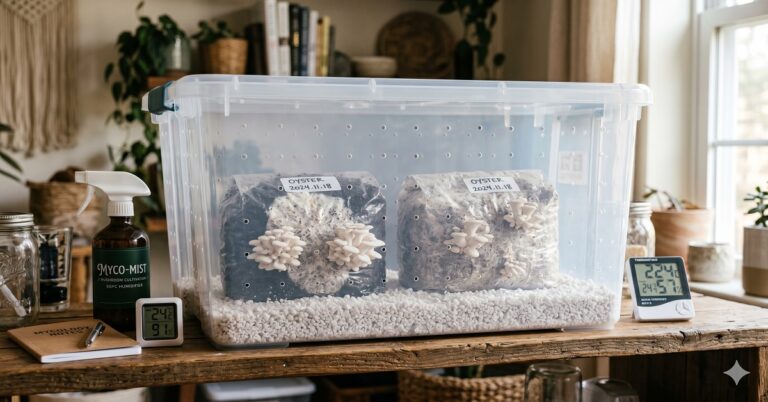
Still Air Box (DIY — 66qt Sterilite Tote)
Role in system: Creates a still-air microenvironment for
inoculation by eliminating turbulent air currents that carry
airborne contaminants. Two arm holes cut in the end face.
Total build cost: $12–15. Achieves equivalent contamination
rates to a flow hood for batches under 20 jars. Full
comparison:
SAB vs flow hood →
Check Price →
SYSTEM COMPONENT: Grain Spawn Vessel
Wide-Mouth Quart Mason Jars — 12-Pack
Role in system: Contains sterilised grain during pressure
cooking and colonisation. Wide-mouth lids are modified with
a polyfill-stuffed hole for gas exchange while excluding
contaminants. The wide mouth allows the breaking and
shaking that accelerates colonisation speed. Full
modification guide:
grain spawn guide →
Check Price →
SYSTEM COMPONENT: Sterile Substrate Housing
Polypropylene Mushroom Grow Bags — 0.5 Micron Filter Patch
Role in system: Heat-resistant autoclave-safe bag that
contains bulk substrate during sterilisation and colonisation.
The 0.5 micron filter patch allows CO₂ out and O₂ in while
excluding fungal spores and bacteria. Filter patch size and
micron rating are the two non-negotiable quality specifications.
Full guide:
grow bags ranked →
Check Price →
SYSTEM COMPONENT: Substrate (Consumable)
Hardwood Fuel Pellets (HWFP) + Soybean Hulls
Role in system: The carbon and nitrogen source that fuels
mycelial growth. HWFP (plain compressed hardwood — no
accelerants or binders) at 85% + soybean hulls at 15%
produces the Master Mix substrate achieving the highest
consistent yields of any hardwood formulation. Rehydrated
to field capacity before sterilisation. Full
formula:
Master Mix guide →
Check Price →
Level 4: Serious Producer ($350–$700) — Scale-Up Equipment
Level 4 System Components
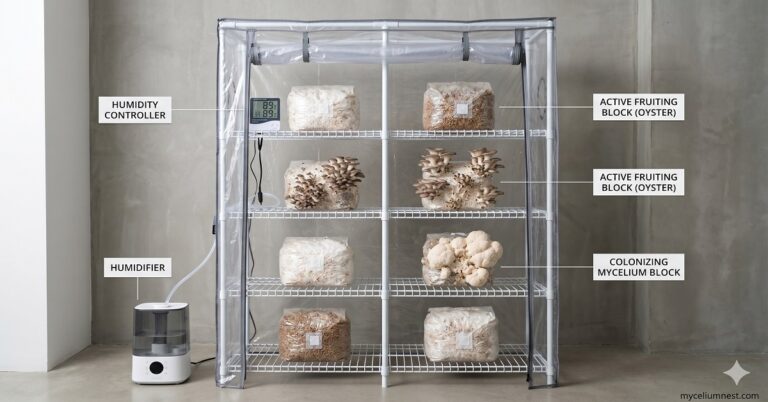
SYSTEM COMPONENT: Humidity Containment
4-Tier Martha Tent (Wire Shelving + Clear Cover)
Role in system: Creates a defined microenvironment where
humidity, temperature, and FAE can be precisely controlled
across all fruiting blocks simultaneously. The clear cover
allows block monitoring without opening and disturbing the
environment. Replaces block-by-block humidity management
with single-system management. Full setup
guide:
grow tent guide →
Check Price →
SYSTEM COMPONENT: Humidity Regulation
Ultrasonic Humidifier + Inkbird IHC-200 Controller
Role in system: The humidifier generates ultrafine water mist;
the Inkbird controller reads live RH from a probe sensor and
switches the humidifier on and off to maintain your target
humidity band (±2%). Together they replace manual misting 4–6
times daily and eliminate both under- and over-humidification
as failure modes. Full
guide:
humidifier guide →
Check Price →
SYSTEM COMPONENT: Fresh Air Exchange
AC Infinity Cloudline 4″ Inline Fan
Role in system: Exhausts CO₂-rich tent air and replaces it
with fresh O₂-rich air from the surrounding room. Elevated
CO₂ is the primary suppressor of pin formation — many
mysterious “won’t pin” problems are FAE failures. Run on a
timer: 15 minutes on per hour as a starting point, adjusted
by species CO₂ tolerance. Pairs with the HEPA filter for
respiratory protection at scale.
Check Price →
SYSTEM COMPONENT: Liquid Culture Production
Magnetic Stir Plate
Role in system: Continuously agitates liquid culture jars
during incubation, preventing mycelial clumping and producing
a 2–3× denser, more evenly distributed LC than static
incubation. At 10+ batches per month, the density improvement
reduces inoculation volume required per jar and stretches LC
yield significantly. Pays for itself in spawn savings within
the first month at scale.
Check Price →
SYSTEM COMPONENT: Bag Sealing
Impulse Heat Sealer
Role in system: Creates an airtight weld at the top of
polypropylene grow bags after inoculation — the final
contamination barrier before colonisation. At 20+ bags per
batch, the speed and consistency of a heat sealer versus
manual folding-and-clamping eliminates the weak-seal
contamination pathway that becomes a meaningful failure mode
at scale. Investment: $25–50. Contamination reduction: significant.
Check Price →
What NOT to Buy: Common Waste Purchases
Skip These Until You’ve Proven You Need Them
Flow hood at Level 1–2: A well-used still air box achieves equivalent contamination rates for batches under 20 inoculations. Wait until you’re consistently running 20+ jars per session before the upgrade is genuinely justified.
Lab-grade autoclave: A Presto 23-Quart runs 2–4 cycles per month for typical home operations. An autoclave is appropriate for commercial scale, not home production.
Climate-controlled grow tent at Level 1–3: Your home’s ambient temperature is usually adequate for oyster mushrooms. Temperature control becomes important when you’re running cold-fruiting species or when your ambient environment is too warm consistently.
“Mushroom growing kits” with unnecessary extras: Many kit bundles include $5 of substrate, a thermometer you already have, and a spray bottle — packaged together at 3× the individual item cost. Build your own supply list from this guide.
The True Cost Per Harvest Calculation
| Level |
Equipment Cost |
Per-Batch Materials |
Avg Yield/Batch |
Cost Per 100g |
| Level 1 (Kit) | $0 | $30–45/kit | 300–600g | $7–15 |
| Level 2 (Straw) | $40–80 | $8–15/batch | 500–1,000g | $1.50–3.00 |
| Level 3 (Grain Spawn) | $150–250 | $5–12/block | 200–500g/block | $1.00–2.40 |
| Level 4 (Full System) | $350–700 | $3–8/block | 300–600g/block | $0.50–1.60 |
Deep Dives on Every Equipment Category
This article contains Amazon affiliate links. See our full disclosure.