We have run both Martha tent and traditional grow tent setups over 4 years. The humidity management differences, yield comparisons, and automation system described here are from direct operational experience across both formats.
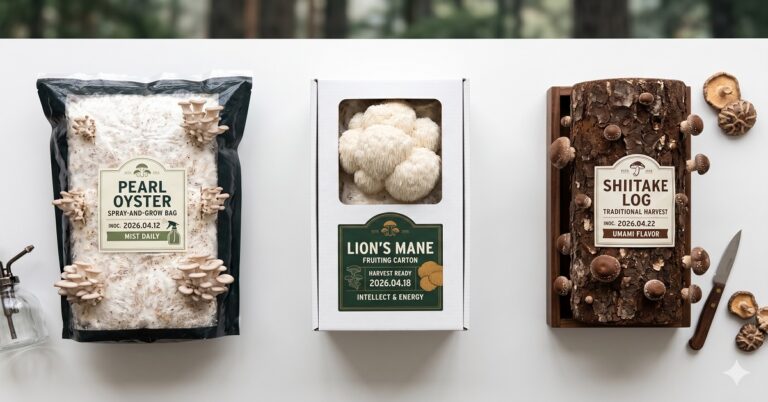
Best Mushroom Grow Tent – Martha Tent Wins. Here’s Why.
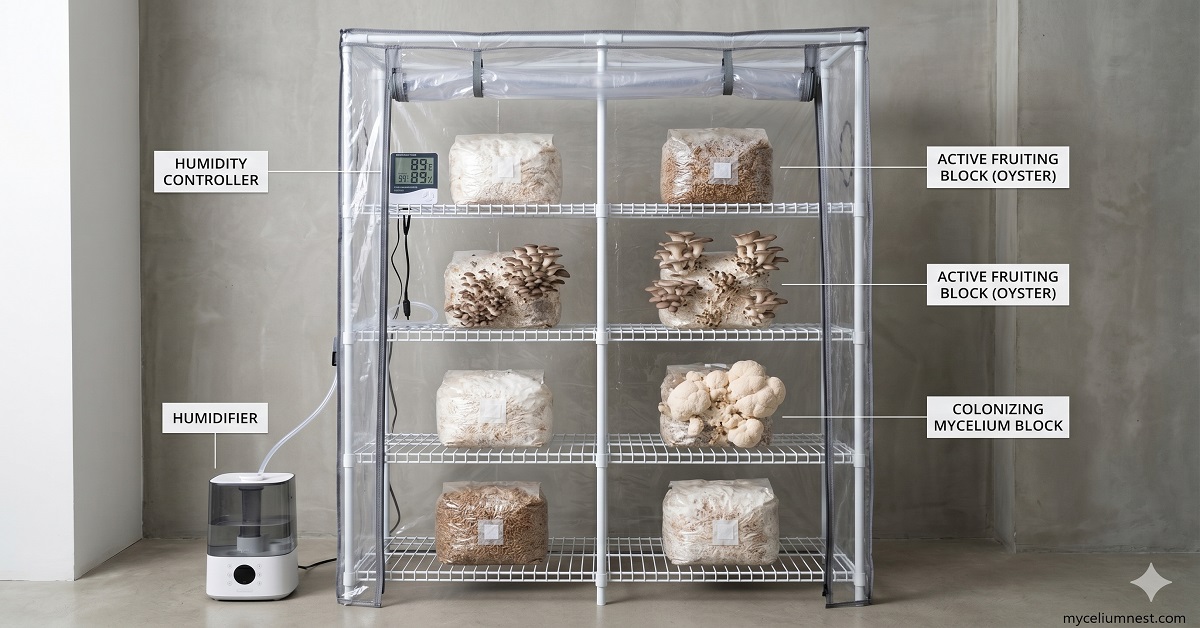
The “Martha tent” — a wire shelving unit inside a clear plastic tent cover — has become the dominant home mushroom production setup because it solves the two problems that make mushroom fruiting chambers difficult: humidity containment and block accessibility. The clear cover creates a high-humidity microenvironment while allowing visible monitoring and easy opening for harvesting. Traditional grow tents work but are designed for plant growing and have specific limitations for mushroom cultivation.
Martha Tent vs Traditional Grow Tent: The Key Differences
Martha Tent — Clear Plastic over Wire Shelving
Advantages
Full visibility through clear cover — monitor every block without opening
Easy front-access for harvesting — no reaching through a zip opening
Wire shelving is washable and allows complete humidity exposure to blocks
Modular — add or remove tiers as needed
Significantly cheaper than equivalent-size grow tents ($60–100 vs $80–150)
Limitations
Plastic cover not as airtight as a purpose-built grow tent — slight humidity loss
Not light-proof if specific light cycles are needed (rarely required for mushrooms)
Traditional Grow Tent — Fabric Enclosure with Zips
Advantages
More airtight — better humidity retention without a humidifier
Light-proof (useful for species sensitive to light cycles)
More robust construction for long-term use
Better for hydroponic setup integration (not needed for mushrooms)
Limitations for Mushrooms
Cannot monitor without opening — disturbs the environment constantly
Fabric interior harder to clean — mushroom spore and contamination build-up
Zip access is awkward for large block harvesting at scale
The Complete Martha Tent Setup
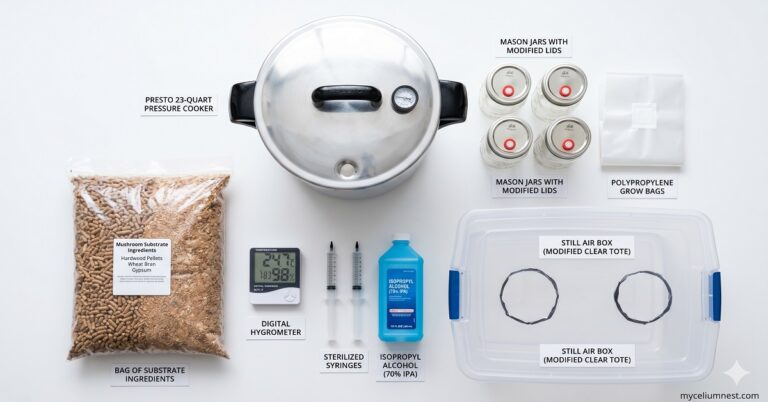
Equipment List — 4-Tier Martha Tent
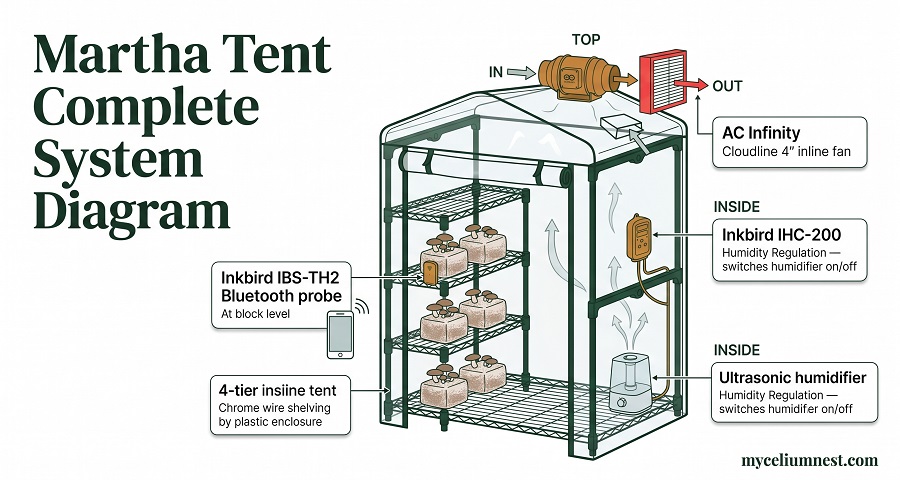
The Martha tent as an automated system — six components working
together to maintain precise fruiting conditions hands-free.
The Martha Tent as a System — All 6 Components
SYSTEM COMPONENT: Structure
4-Tier Chrome Wire Shelving Unit (60×30×150cm)
Role in system: The load-bearing frame that holds fruiting
blocks at multiple height levels, maximising vertical space
utilisation. Wire construction (not solid shelves) is essential
— humidity must reach block undersides equally. Minimum
30cm depth per shelf to accommodate standard 2.5kg blocks
with drainage clearance. Chrome resists the constant moisture
exposure without rusting.
Role in system: Encloses the wire shelving to create a defined
high-humidity microenvironment separate from the surrounding
room. Clear material is non-negotiable — visual block
monitoring without opening preserves the humidity environment
and eliminates the unnecessary disturbance that causes
premature pinning abort. The front zip opening should span
the full height for unobstructed harvest access.
Role in system: Produces ultrafine water mist that raises
relative humidity inside the tent to the 88–95% target range.
Ultrasonic (not warm mist or evaporative) is required —
the fine droplet size suspends in air long enough to saturate
the tent environment before settling. Use distilled water
exclusively: tap water minerals create white dust that coats
blocks and clogs the humidifier element within weeks. Full
sizing and brand guide: humidifier guide →
Role in system: Reads live RH from a probe sensor inside
the tent and switches the humidifier on and off to maintain
your target humidity band (±2%). The humidifier plugs into
the Inkbird outlet — the controller becomes the humidifier’s
brain. Set target: 88–92% RH for oyster; 85–90% for lion’s
mane. Prevents both under-humidification (aborted pins,
cracked caps) and over-humidification (bacterial wet rot
on blocks). The single most impactful Level 4 automation
upgrade.
Role in system: Exhausts CO₂-saturated tent air and replaces
it with fresh air from the surrounding room. CO₂ accumulation
above 1,000–2,000 ppm suppresses pin formation in most
oyster species — FAE failure is the most common cause of
healthy colonised blocks that inexplicably refuse to pin.
Timer setting: 15 minutes on per hour as the starting point.
Pairs with the HEPA filter on the exhaust port to prevent
spore drift into living spaces at scale.
Role in system: Provides continuous RH and temperature
readings logged to your phone via Bluetooth, with historical
graphs showing the humidity range your tent is actually
achieving over time. Position at block level — not near the
humidifier outlet where readings are artificially elevated.
The historical data reveals patterns invisible to spot-checks:
overnight humidity drops, FAE cycle temperature spikes,
and the specific conditions that correlate with your best
fruiting flushes. Non-negotiable at Level 4 scale.
Role in system: Captures mushroom spores from exhaust air
before they re-enter the living space. Attached to the
exhaust port of the AC Infinity fan — spore-laden tent air
passes through the fan and then through the HEPA filter
before entering the room. At 8+ actively fruiting blocks,
spore loads in an enclosed home without HEPA filtration
can reach concentrations associated with respiratory
irritation in sensitive individuals. HEPA-13 grade minimum.
Full safety protocol: see Spore Management section above.
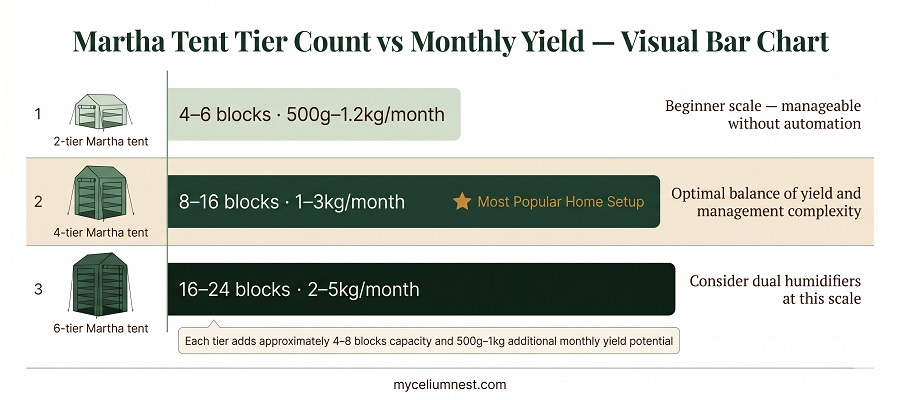
Monthly yield scales with tier count — choose the setup that matches
your consumption target and available space.
Setup
Blocks Capacity
Monthly Yield (est.)
Automation Recommended?
2-tier Martha
4–6 blocks
500g–1.2kg
Optional — manual misting viable
4-tier Martha ⭐
8–16 blocks
1–3kg
Yes — humidifier + controller
6-tier Martha
16–24 blocks
2–5kg
Yes — dual humidifiers considered
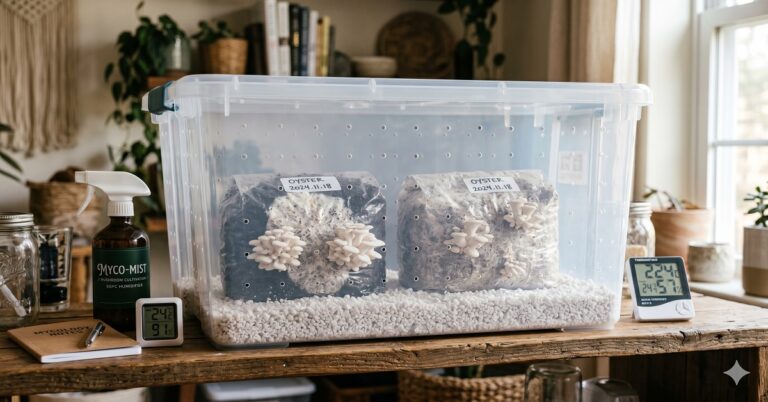
The Automation Protocol — Set-and-Leave Management
A properly automated Martha tent runs with minimal intervention. The target is a system that maintains 88–92% RH inside the tent automatically, with the FAE timer providing CO₂ management on schedule. Full details on humidity management, humidifier sizing for your tent volume, and the complete Inkbird controller setup are in our humidifier guide. For species-specific fruiting conditions within the tent, see our complete fruiting conditions guide. Penn State Extension’s mushroom cultivation resources provide the agronomic science behind environmental parameters for commercial production that informs home automation targets.
Spore Management: The Indoor Air Quality Protocol
Every grow tent guide discusses humidity and FAE. Almost none discusses the issue that becomes critically important when you scale beyond 4–6 blocks indoors: spore load and respiratory safety.
Oyster mushrooms (Pleurotus species) are prolific sporulators — a single mature fruiting cap can release billions of spores over a 24–48 hour period. In a properly ventilated outdoor or commercial environment this is inconsequential. In a sealed home environment running 8–16 actively fruiting blocks, cumulative spore concentrations can reach levels documented to cause hypersensitivity pneumonitis (HP) — a reversible but serious inflammatory lung condition — in susceptible individuals with repeated exposure.
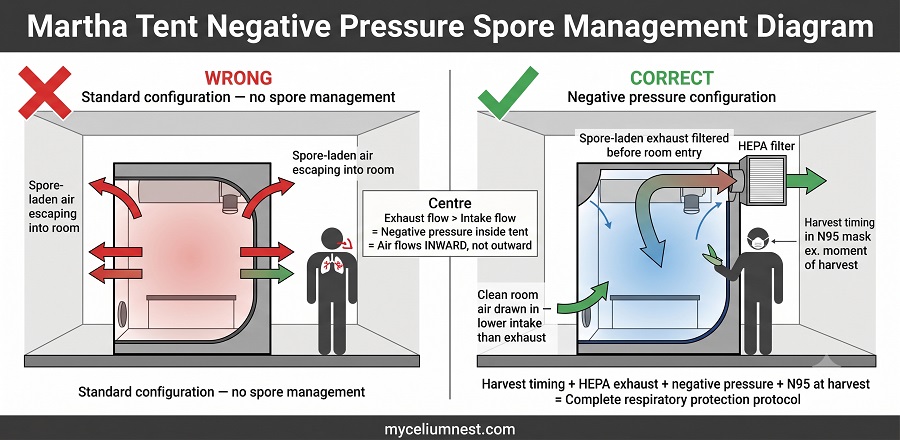
Negative pressure configuration keeps spore-laden tent air from
drifting into your living space at scale.
⚠ Who Is Most at Risk
Higher risk: People with asthma, pre-existing lung conditions, or immune compromise; those who spend significant time in the growing room daily; growers running 8+ blocks in enclosed spaces with poor general ventilation.
Lower risk: Casual growers with 1–4 blocks in a well-ventilated space; growers who harvest promptly at pin-to-break stage before peak sporulation; growers using HEPA exhaust filtration.
The 4-Layer Spore Management Protocol
1
Harvest Timing — The Primary Prevention. The highest spore release occurs as caps mature past the curled-edge stage. Harvest oysters when cap edges are still slightly curled inward — 12–24 hours before they would fully flatten. This single practice reduces spore output by 70–80% compared to harvesting late. The “pins broken off the substrate” stage is peak freshness AND minimum sporulation simultaneously.
2
HEPA Exhaust Filtration. Attach a HEPA filter housing to the exhaust port of your inline fan. The fan already exhausts tent air into your living space — a HEPA filter on this exhaust line captures spores before they re-enter the room. HEPA 13-grade filtration at 4-inch diameter: $15–25 add-on. This is the most important upgrade for anyone running 8+ blocks indoors.
3
Negative Pressure Tent Operation. Configure your FAE so exhaust airflow exceeds intake — this keeps the tent at slightly negative pressure relative to the surrounding room. Air flows from the room INTO the tent rather than spore-laden tent air flowing outward. Combined with HEPA exhaust filtration, this prevents spore drift into the living space during normal tent operation. Set intake to 60% of exhaust flow volume.
4
Personal Respiratory Protection During Harvest. When harvesting mature clusters from multiple blocks in an enclosed space, wear an N95 mask. The brief but intense spore exposure during manual harvesting of mature blocks — shaking the substrate, pulling clusters — is the highest-concentration exposure event in the grow cycle. An N95 mask costs less than $1 per wear and eliminates the primary exposure pathway entirely.
For 1–4 blocks in a reasonably ventilated home: Spore management is a minor concern — good harvest timing is sufficient. For 8+ blocks in a sealed room or apartment: implement the full 4-layer protocol. The goal is sustainable, long-term cultivation — not a dramatic first season followed by respiratory symptoms that end the hobby.
Written by the MyceliumNest Team · Tested & Verified We purchased and grew from every kit on this list. Yield data reflects our actual results across 2–3 flushes per kit, not manufacturer claims. Last updated: 2025. Quick Answer The North Spore Pearl Oyster Kit is our #1 pick for absolute beginners — consistently reliable pins…
Written by the MyceliumNest Team We have built three different cultivation operations over four years — from first grow kit to a 20-block monthly production. This guide shows the logical buying progression and what genuinely matters at each stage versus what beginners waste money on. Mushroom Growing Supplies – The Equipment Progression Truth The most…
Written by the MyceliumNest Team We’ve built and tested multiple fruiting chamber setups across different species and climates. This guide covers the two most proven designs for home growers at every scale. A fruiting chamber is the controlled environment in which colonised mushroom substrate produces fruit bodies. While it’s technically possible to fruit mushrooms by misting a…
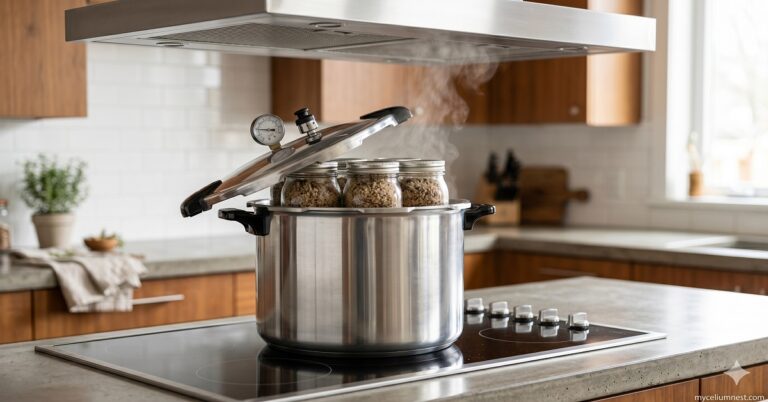
Written by the MyceliumNest Team · Equipment Tested We have used pressure cookers for mushroom cultivation for 4+ years across hundreds of sterilisation runs. Rankings are based on PSI accuracy, jar capacity, build quality, and long-term reliability — not retail price or commission rates. Quick Verdict The Presto 23-Quart Pressure Canner is the best pressure…